Blueberry Galette with Frangipane Filling

Blueberry galette is almost a weekly necessity around here. It is one of my husband’s love languages, especially a la mode or paired with some good quality vanilla ice cream. Since I make it so often and being that I am a busy mom, I always keep store-bought pie dough in the freezer. A pint or two of blueberries is always on the weekly grocery list, and thankfully, you can find them in stores year round.

A galette is basically a French crusty pie that is rustic and faster to make than a traditional pie. I like using blueberries or any other fruit that holds its shape a bit after cooking. Check out my persimmon post here. Pears and apples work great as well.

Filling a galette with something besides just the fruit is absolutely not necessary, but I like to layer the bottom with frangipane to give it a little more richness. Frangipane is an almond cream that takes this galette to the next level of yum!

Pro-Tips:

  • The amount of sugar used in this recipe can be modified to suit your taste buds. I personally don’t like desserts that are unbearably sweet, especially when paired with ice cream.
  • Use a pie dish lined with a large piece of parchment paper instead of a baking sheet. This prevents the galette from spreading out too much during baking and it helps to contain the fruit and juices inside the shell.

Ingredients:

  • 1 Frozen store-bought pie crust, thawed

For the frangipane filling:

  • 1 cup almond flour
  • 1 tablespoon all purpose flour
  • 1/4 cup sugar (1/2 cup if you’d like it sweeter)
  • 1/2 cup (113 g) butter, softened
  • 2 eggs (beat one of the eggs in a separate bowl and reserve a little bit to brush the galette at the end)
  • 1 teaspoon vanilla

For the blueberry filling:

  • 1 pint blueberries
  • zest of 1 lemon
  • 2 tablespoons sugar
  • 1 teaspoon corn starch

Preparation:

  1. Preheat oven to 400°F. Mix the frangipane ingredients in a bowl with a whisk or spatula until it becomes a smooth cream.
  2. Tip: Beat one egg in a small separate bowl. Add some to the frangipane and reserve about 1/2 to use as your egg wash later.
  3. Combine the blueberries with lemon zest, sugar and corn starch in a separate bowl. Toss gently with a spoon.
  4. Lay the pie crust gently over the parchment paper inside the pie dish. Spread the frangipane almond cream evenly over the middle of the crust, leaving about a 2 inch border. Next, spread the blueberries on top of the frangipane. Fold the dough up and over the blueberries and pleat the entire border.
  5. Brush the dough with the reserved egg wash. Sprinkle with some sugar and slivered almonds to create a really crispy crust and add texture.
  6. Bake the galette for 35-40 min until the crust is just golden brown. The blueberries and frangipane will be a bit bubbly. Allow to set and cool for at least 2 hrs.

Serving the galette with ice cream or whipped cream is highly suggested!

Advertisement

Italian Not-Just-For-Sunday Sauce

When I first met my husband I was introduced to a new culture. Originally from the Philadelphia region, his dad’s side of the family grew up surrounded by Italian culture, being second generation children of an Italian father. I grew up eating pasta. My mom always made Salvadorian style spaghetti with a little bit of cream or a simple tomato sauce with tomato paste, water and some chicken bouillon. The next day she would scramble left over spaghetti with eggs and put in a sandwich roll and pack it in my lunch bag. In other words, I always had a connection to pasta because it’s economical and you can make it simple but delicious. I also knew Italian food from Olive Garden, but I had never had pasta before in an Italian home. I didn’t know about anti-pasto bites like asparragus wrapped in prosciutto, salame and homemade pizzelle cookies. I had never tasted the robust meatballs and sausage that always welcomed us at grandma’s house in Philly, not just on Sunday but on any special day. It turns out, after doing some DNA research, that my father-in-law’s ancestors were originally from the Abruzzo region in Italy and their traditions have apparently survived in their cooking that I am now proud to help pass on to the next generation. I also have a tiny of percentage of Sardinian which I fully embrace. And I am not going to go into a long history lesson here, but the moral of the story is that I love the way food reconnects us to who we are deep inside.

Here’ s a family recipe for Sunday Sauce like my mother-in-law taught me with a few of my own modifications.

The first element is the meatballs. Next are the Italian sausages, which should be browned before adding them to the sauce. Last but not least, I added braciole to make this dish extra special.

Meatballs:

  • 1 lb ground beef
  • 1 lb roll of sage sausage
  • onion powder
  • garlic powder
  • 1 cup Italian breadcrumbs
  • 2 beaten eggs
  • 1/2 cup Parmesan Cheese or Pecorino Romano
  • Chopped flat leaf parsley
  • A dab of mustard (optional)
  • Salt & pepper

Braciole:

  • 1 lb top round beef, thinly sliced and pounded
  • 1 cup of Italian or seasoned breadcrumbs
  • Chopped parsley
  • 1 cup grated parmesan cheese
  • 1 Provolone cheese, cubed or grated
  • Slices of prosciutto di Parma, one for each slice of beef

For the sauce:

  • 1 small can of tomato paste
  • 3 cans of diced tomatoes, blended
  • 1 jar of homemade passata or substitute with 1 can tomato juice or sauce
  • 1 small onion quartered
  • 1 bell pepper, quartered and deseeded
  • 2 cloves of garlic
  • A large bundle of fresh parsley and basil tied with kitchen twine
  • Red wine
  • 1 package of 5 mild Italian sausages cut in half and browned

Preparation:

First make the meatballs by combining all the meatball ingredients in a large bowl. Mix with clean hands and form balls about the size of golf balls. Place them on a baking sheet that has been previously sprayed with non-stick cooking oil. Bake the meatballs at 350F for 30 minutes or until browned. You can also fry the meatballs, but I prefer to bake them so I can cook other things while the meatballs are in the oven.

To make braciole, begin by pounding the meat slices on a cutting board by placing the meat in between two sheets of plastic wrap. I prefer using a ziplock back because it will hold up until you finish pounding all the meat. Place all the meat slices in an assembly line on some parchment or wax paper. Next, mix the parmesan cheese, breadcrumbs and parsley. To begin the assembly, place a slice of prosciutto, then the breadcrumb mixture on top of each slice and roll. Tie each meat roll-up with two pieces of kitchen twine and continue the assembly. Next, brown the braciole on all sides in a pan o pot with a little olive oil or spray. Save aside for later.

To make the sauce, add a little more oil or cooking spray to the same pot and fry up the onion, garlic and bell pepper along with the tomato paste. This mixture will start to brown. At this point you can add about a cup of red of wine and bring it to a simmer deglazing the pot at the same time. Those bits and pieces will add flavor to your sauce.

Layer the braciole, meatballs and browned sausage in a slow cooker. Next, pour the wine mixture, tomato sauce and blended diced tomatoes over the meat. Place the herb bundle on top, add a little salt and pepper and cover. Cook on high for 5 hrs then switch to low or warm (or cook on low heat for 3hrs if you are making this on the stove top). You can lightly stir it occasionally and push the herbs down so they get immersed into the sauce. Taste and adjust the flavor. If the sauce tastes a bit tart, feel free to add a pinch or more of sugar.

*The sausages and the meatballs add lots of flavor to the sauce so don’t go crazy with the salt, but rather add a pinch here and there gradually until the sauce reaches your desired level of saltiness.

Remove the herb bundle and large pieces of onion/bell pepper before serving with pasta of your choice.

Summer Tarts

This week I went tart crazy! I had an opportunity to cook for a friend who had surgery recently and who also happens to have a gluten intolerance. I cooked a full meal of stuffed bell peppers and rice, and for dessert I made these fruity tarts. The crust is gluten-free and made with almonds, walnuts, and cashews. It’s nutty, crunchy, and more flavorful than a traditional pastry crust in my humble opinion. The filling is passion fruit pastry cream.

DSC_0865

You are probably familiar with passion fruit which can be found in juices, desserts, teas, and much more. This tropical fruit tastes a little bit like guava, but less intense, and it has a bit of tartness like kiwi. Growing up in El Salvador I became familiar with a few different kinds of granadillas, which is a general name for any fruit that resembles passion fruit. It looks like a maraca and it has pulp and seeds inside. I’ve been looking for fresh passion fruit to photograph and add to this post without much luck. My quest isn’t over yet though. But for now, frozen pulp will have to do. You can find it in Latino grocery stores. If you can’t find it, you can use actual juice that has passion fruit in it.

DSC_0860

I meant to make mango tarts to compliment the tropical flavor of the passion fruit, but my mangoes were not ripe enough, so I had to improvise and use other fruit I had in the fridge. As a cook you have to improvise all the time and make things work with what you have available. It’s impromptu experimentation that leads to new discoveries. My inspiration for part of the recipe was Pati Jinich’s Mango Tart, especially the apricot and wine glaze.

Passion Fruit Tart

Nut Crust:

1 ½ cups mix of nuts like walnuts, cashews, pistachios, or pecans (peanuts are fine if you’re not allergic)   
1 cup almond flour (or grind your own almonds)
¼ cup maple syrup or honey (sugar is fine, too)
1 egg
¼ cup cold butter, cubed (½ stick of butter)

Passionfruit Pastry Cream:

½ cup milk (I had 2% in the fridge)
¾  cup heavy cream
1 teaspoon vanilla extract
3-5 egg yolks (I used the leftover yolks from this Swiss Meringue Recipe)
¼ cup sugar
2 tablespoons cornstarch
½ cup thawed passionfruit pulp or juice

Fruit:

Any fruit you have available such as strawberries, mango, canned mandarin oranges, berries, kiwi, etc.

Glaze:

½ cup apricot jam
½ cup white wine or orange liqueur (you can use sub orange juice)

Make the crust: Preheat the oven to 350F. Grind the nuts in a food processor. Next, add the rest of the crust ingredients and pulse until the mix gets crumbly. You do not want a ball of dough.

Use mini tart pans with removable rings. This mix makes 8 4 inch tarts or 1 large 10 inch tart.

Press some of the nut mix into the bottom and up the sides of each tart pan. Bake the crusts on a large cookie sheet for about 15-17 minutes or until slightly golden. Allow to cool completely in the pans.

You can work on the next two steps while the crusts are baking and cooling:

Glaze: In a small saucepan, combine the apricot jam and wine. Mix to fully dissolve and simmer on low-medium heat until it reduces and becomes syrupy. This will take about 10 minutes. Cool and set aside. It thickens up a bit more when it cools.

Passionfruit Pastry Cream: In a bowl, whisk together sugar and cornstarch. Measure the milk and cream in a measuring cup and add the egg yolks. Whisk to combine the egg yolks and milk. Add the milk and egg mixture to the the sugar and cornstarch and whisk to combine. This is the easy method. No need to heat the milk first to temper the eggs.

Pour the cream mixture into a saucepan and set over medium heat and mix consistently with a wooden spoon until it thickens.  Add the passionfruit pulp at the end and stir the cream a little more to incorporate into the cream. Cool and place in the fridge until ready to use.

To assemble your tarts, begin by filling the crusts with a couple of tablespoons of cream. Arrange the fruit on top however you wish. Have fun with the process. If making 1 large tart you may want to arrange sliced fruit in a circle starting from the edges and working your way towards the center.

Brush the fruit with the glaze. Refrigerate the tarts overnight to set. Gently remove cooled tarts from the tart rings before serving.

Light & Easy Peach Tart (Gluten Free)

DSC_0904

You Need:

Nut Crust 
Filling: About 2 cups of peach yogurt or greek yogurt mixed with a little honey (for 8 mini tarts)
Sliced peaches or plums
Glaze: ¼  cup honey & ¼ cup orange juice (no need to cook or reduce)

Follow the steps above to make the crusts for 8 tarts. Allow the baked crusts to cool to room temperature.

Fill each tart with yogurt and top with peaches and/or plums. Brush with honey/orange juice glaze. Sprinkle with some crushed nuts and refrigerate for about 30 minutes before serving.

DSC_0926

Plátanos: Plantains

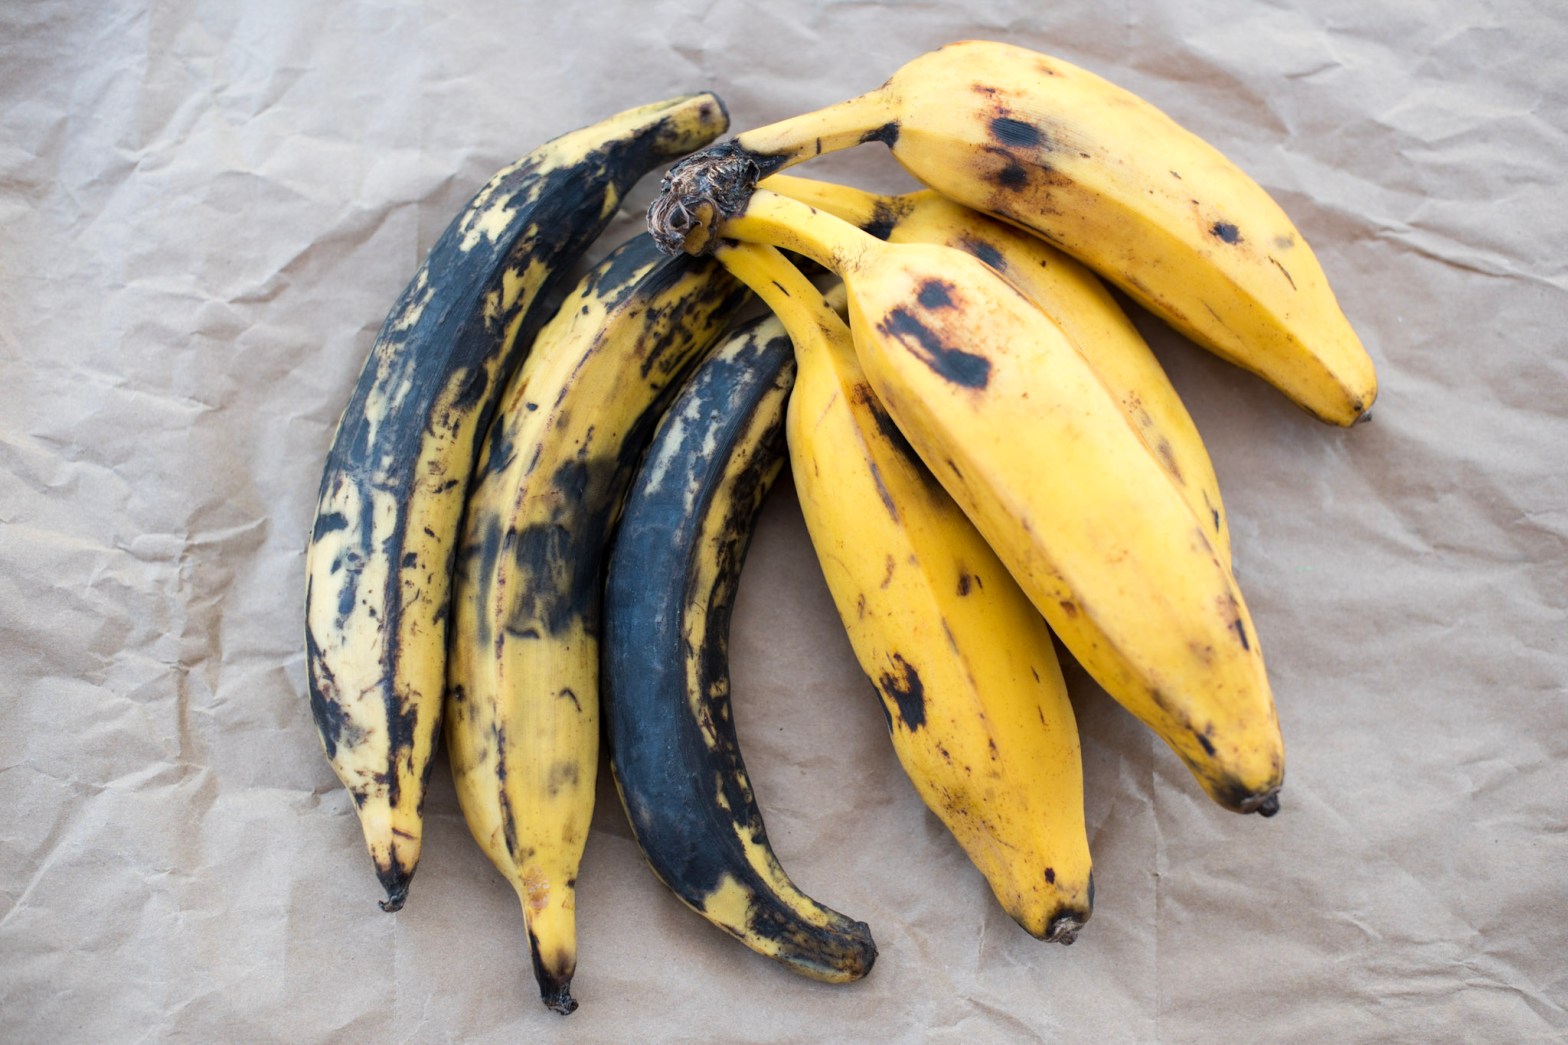
Plantains, bananas, and banana leaves are deeply ingrained in Latin American cuisine. Plantains are more dense than bananas and mostly used in cooking whereas bananas are eaten as fruit. Bananas and plantains have an interesting origin and are perhaps one of those fusion ingredients brought by the explorers to the new world from Asia in the Columbian Exchange. Some sources say they come from Africa, India, or Southeast Asia. In Central America and in the Caribbean bananas are called guineos which is actually a clue to their possible origin, not Guinea in Africa where they were brought perhaps in the 13th century by Muslim traders, but a more likely origin is the island of Papua New Guinea as well as the Philippines.

DSC_9925

Most likely due to their versatility, starchy texture, and high nutritional value, bananas and plantains quickly became staples all over Central America and the Caribbean where the climate is tropical and ideal to grow all sorts of banana varieties.  It was used both for the fruit and for intercropping. It became a cheap source of food for the slave population of the Caribbean, hence evolving into the numerous ways in which bananas and plantains are used in Caribbean cuisine today.  Banana leaves are used to wrap tamales and in other recipes it is steamed like in pollo en achiote. The leaves are not actually eaten but they add a subtle flavor to foods that is very unique to Mesoamerican, South American, and Caribbean cuisine. Who came up with the idea of wrapping tamales in banana leaves? I’m not sure. However, in tropical climates bananas leaves are plentiful whereas corn husks may not be as widely available.  Wrapping tamales in any kind of edible leaf is a tradition dating back to pre-Columbian times. Cooking is all about creativity, being resourceful, and using whatever is available in your environment. That’s something that we take for granted given the wide variety of goods from around the world found today in supermarkets.

DSC_9922

The manzano plantain that you see above here is what used to grow in my childhood home in El Salvador. We planted only a couple of trees at first, but they didn’t take long to quickly multiply so we always had an abundant supply of this type of plantain that we know as guineo majoncho. One of my favorite afternoon snacks was fried majonchos and also plantains cooked in simple syrup and cinnamon. It’s what you do as a kid in El Salvador. Any fruit or vegetable becomes a snack and you learn to cook early on in life. You became resourceful and snacks didn’t need to be store bought.

On our trip to France a few years back we had the wonderful opportunity to sample West African dishes for the first time at the home of our friends from Benin. Fried plantains were served with chicken and rice. It was an African dish, yet it tasted and looked very familiar to me.  It was almost identical to what you would find in a Cuban restaurant. That’s when I first began to wonder about the origins of plantains and how they became infused in Latin American cooking. I find those kind of things very fascinating.

Plátanos en gloria: Plantains cooked in syrup

Very easy.

Ingredients:

  • Ripe plantains, peeled and sliced
  • Two cups of water or more depending on how many plantains you’re making
  • 1 cup of sugar or 1/2 cup of agave syrup
  • 1 cinnamon stick

Add all the ingredients to a small saucepan or pot. Bring to a boil and then simmer for about 30 minutes or until the liquid has reduced to a syrupy consistency and the plantains are slightly browned.

Serve with sour cream or yogurt. It makes a great topping for pancakes or French toast.

DSC_9962

Plátanos rellenos con picadillo: Stuffed Plantains

Ingredients:

  • Ripe plantains
  • 1/3 lb ground pork for two plantains
  • Finely chopped bell pepper, tomato, and onion
  • Capers
  • Olive oil
  • Salt and Pepper
  • Any kind of cheese that melts

Preheat the oven to 400°F. Cut a slit lengthwise through the plantain being careful not to cut all the way through. Remove the skin. Place them in a baking dish and drizzle with olive oil. Roast uncovered for about 20 minutes.

In the meantime, prepare the meat filling or picadillo. Add olive oil to a pan and brown the ground pork. Season with salt and pepper, then add the bell pepper, tomato, onion, and about a tablespoon of capers. Continue browning until the meat is cooked through and flavorful from the added ingredients.

Stuff the plantains with meat filling and sprinkle some cheese on top. Put them back in the oven for a couple of minutes to melt the cheese and they’ll be ready to serve!

Sweet Plantain Empanadas

DSC_0024

We have two versions in El Salvador, either with a custard filling or refried beans. As a kid I preferred the custard filling or leche poleada. It’s a yummy dessert.

Ingredients for 8 empanadas:

  • 4 ripe (but not too ripe) plantains
  • 3 tablespoons coconut flour or plain flour (optional)
  • 1/2 teaspoon ground cinnamon
  • Coconut oil or canola oil for frying

Leche Poleada (Milk Custard):

  • 1/2 cup cornstarch
  • 2 cups half & half or whole milk
  • 1/2 cup sugar
  • 1/2 teaspoon ground cinnamon
  • 1 teaspoon vanilla extract

Cook the plantains:

Cut the tips off the plantains and then cut in half, cover with water in a pot, and add a cinnamon stick. Cook them over medium heat for about 15 min. or until you seem them plump up a bit. Peel and mash the plantains with a fork or masher and add a tablespoon of coconut flour, one at a time until it becomes the mixture becomes a soft dough. Coconut flour is not a traditional ingredient in Salvadorian empanadas, but after experimenting I find that the dough is easier to manage without tasty too doughy and I love the flavor of coconut. Make sure to oil your hands to prevent the dough from sticking.

Filling:

*Next, let’s prepare the filling. We call it leche poleada and it can be prepared to the desired thickness or consistency depending on what it’s being used for. In this case, it needs to be a very stiff custard so that it doesn’t ooze out of the empanadas. You can also use refried beans in this recipe, which need to be cooked down to about the same consistency as the plantain dough.

Combine all the custard ingredients in a blender. Pour the mixture in a saucepan and heat slowly on medium heat. Stir constantly  for about 5 minutes with a wooden or plastic spoon until it thickens up almost to a doughy consistency. Remove from the heat.

Assembling and frying:

Next, make a ball of plantain dough with wet or oiled hands and flatten it like a tortilla. Place about a tablespoon of the custard in the middle and close up the empanadas between both hands making sure to seal all the sides. Repeat the process.

In a deep skillet, add enough oil to fry the empanadas.  Fry the empanadas on medium heat until they brown on all sides. Drain excess oil on paper towels. Serve warm and rolled over sugar and cinnamon.

*Coconut oil is not traditionally used in this recipe but I think it adds a delicious aroma and layer of flavor that complements the plantains really well. Plus, coconut oil is very heat resistant and better for you.

En Español

Los guineos, plátanos y hojas de huerta están profundamente arraigados en la cocina latinoamericana. Los plátanos son más densos que los guineos o bananos y se utilizan principalmente para cocinar, mientras que los bananos se comen como fruta.Los bananos y plátanos tienen un origen interesante y son quizás uno de esos ingredientes traídos por los exploradores al nuevo mundo desde Asia  a través del intercambio colombino. Algunas fuentes dicen que vienen de África, de la India o del sudeste asiático. En América Central y en el Caribe los bananos se llaman guineos, lo cual es una pista de su posible origen, no Guinea en África, donde fueron llevados tal vez en el siglo XIII por comerciantes musulmanes; pero un origen más probable es la isla de Papua Nueva Guinea y las Filipinas.

DSC_9944


Probablemente debido a su versatilidad, textura densa y alto valor nutricional los plátanos rápidamente se convirtieron en alimentos básicos en toda Centroamérica y el Caribe, donde el clima es tropical e ideal para cultivar todo tipo de variedades de banano. Se utilizaba como fruta pero también para el cultivo intercalado. Se convirtió en una fuente barata de nutrición para la población esclava del Caribe, por lo tanto, esto evolucionó en las numerosas formas en que los guineos y plátanos se utilizan en la cocina caribeña hasta hoy. Las hojas del plátano se utilizan para envolver tamales y en otras recetas se cuece al vapor así como en pollo en achiote. Las hojas no se comen, pero añaden un sabor sutil a las comidas lo cual es muy típico en la cocina mesoamericana, sudamericana y caribeña. ¿Quién tuvo la idea de envolver tamales en hojas de plátano? No estoy segura. Sin embargo, en los climas tropicales las hojas de plátanos son abundantes, mientras que la tusa de maíz no siempre está ampliamente disponible. Envolver tamales en cualquier tipo de hoja comestible es una tradición que se remonta a la época precolombina. El cocinar se trata de ser ingenioso y utilizar lo que está disponible a su alrededor. Eso es algo que damos por sentado dada la gran variedad de productos de todo el mundo que se encuentran hoy en los supermercados.

DSC_9924

El plátano manzano que usted ve aquí es lo que solía crecer en mi hogar de infancia en El Salvador. Primero plantamos sólo un par de huertas, pero no tardaron en multiplicarse rápidamente, por lo que siempre tuvimos una abundante cosecha de este tipo de plátano que conocemos como el guineo majoncho. Una de mis meriendas favoritas de la tarde era majonchos fritos o plátanos en gloria. Es lo que haces cuando eres niño creciendo en El Salvador. Cualquier fruta o verdura se convierte en una merienda y aprendes a cocinar desde bien pequeño. En El Salvador aprendemos a rebuscarnos y no todo necesita ser comprado en la tienda.

En nuestro viaje a Francia hace unos años tuvimos la maravillosa oportunidad de probar platilllos de África Occidental por primera vez en la casa de nuestros amigos de Benin. Nos sirvieron plátanos fritos con pollo y arroz. Era un plato africano, pero sabía y me parecía muy familiar. Era casi idéntico a lo que se puede encontrar en un restaurante cubano. Esa fue la primera vez que comencé a preguntarme sobre los orígenes de los plátanos y cómo se infundieron en la cocina latinoamericana. Este tipo de cosas me fascinan a mí.

Plátanos en gloria: Plátanos cocidos en almíbar

Muy fácil.

Ingredientes:

  • Plátanos maduros, pelados y rebanados
  • Dos tazas de agua o más dependiendo de la cantidad de plátanos que esté haciendo
  • 1 taza de azúcar o 1/2 taza de jarabe de agave
  • 1 palito de canela

Agregue todos los ingredientes a una cacerola o una olla pequeña. Hierva y luego cocine a fuego lento durante unos 30 minutos o hasta que el líquido se haya reducido a un almibar y los plátanos cambien a un color acaramelado.

Servir con crema o yogur. Son muy ricos con para panqueques o torrejas.

DSC_9969

Plátanos rellenos

Ingredientes:

  • Plátanos maduros
  • 1/3 libra de carne de cerdo molida para dos plátanos
  • Chile verde, tomate, y cebolla finamente picados
  • Alcaparras
  • Aceite de oliva
  • Sal y pimienta
  • Cualquier tipo de queso que se derrite

Precaliente el horno a 400 ° F. Se hace una rajadura a lo largo de cada plátano teniendo cuidado de no cortar a través de todo el plátano. Retire la cascara. Coloquelos en un recipiente para hornear y rocíe con aceite de oliva. Hornearlos sin tapar durante unos 20 minutos.

Mientras tanto, prepare el relleno o picadillo. Añada un poco de aceite de oliva a una sartén y dore la carne de cerdo molida. Sazone con sal y pimienta, luego agregue el chile, tomate, cebolla y una cucharada de alcaparras. Continúe dorando hasta que la carne esté cocinada y sabrosa con ingredientes añadidos.

Rellene los plátanos con la mezcla de carne y ponga un poco de queso encima. Póngalos de nuevo en el horno durante un par de minutos para derretir el queso y estarán listos para servir!

DSC_9952

Empanadas de plátano

Tenemos dos versiones en El Salvador, ya sea con un relleno de leche poleada o frijoles fritos. De niña prefería las de leche poleada. Es un delicioso postre.

Ingredientes para 8 empanadas:

4 plátanos maduros (pero no demasiado maduros)
3 cucharadas de harina de coco o harina sencilla (opcional)
1/2 cucharadita de canela molida
Aceite de coco o aceite de canola para freír*

Leche Poleada (también conocido como manjar blanco):

1/2 taza de maicena
2 tazas de leche entera
1/2 taza de azúcar
1/2 cucharadita de canela molida
1 cucharadita de extracto de vainilla

Hervir los plátanos:

Corte las puntas de los plátanos y después partalos por mitad, cubra con agua en una olla y añada un palito de canela. Cocine a fuego medio durante unos 15 min. o hasta que esten cocidos. Pele y aplaste los plátanos con un tenedor o triturador y agregue una cucharada de harina de coco, una a la vez hasta que la mezcla se convierta en una masa suave. La harina de coco no es un ingrediente tradicional en las empanadas salvadoreñas, pero después de experimentar me parece que la masa es más fácil de manejar y además pues me encanta el sabor a coco. Asegúrese de untarse aceite en sus manos para evitar que la masa se le pegue.

Relleno:

* A continuación, preparamos el relleno. Le llamamos leche poleada y se puede preparar de acuerdo al espesor deseado o la consistencia dependiendo para qué lo va a utilizar. En este caso, tiene que ser una crema muy espesa y durita para que no se le salga a las empanadas. También puede utilizar frijoles fritos en esta receta los cuales necesitan estar bien cocidos y fritos hasta llegar a  la misma consistencia de la masa de plátano. A estos les conocemos como frijoles colochos en El Salvador.

Combine todos los ingredientes de la leche poleada en una licuadora. Vierta la mezcla en una ollita y caliente lentamente a fuego medio-bajo. Revuelva constantemente durante unos 5 minutos con una cuchara de madera o plástico hasta que se espese a casi una consistencia pastosa. Retirar del fuego.

Para preparar las empanadas:

A continuación, hacer una bola de una masa de plátano con las manos untadas de aceite y aplane con las dos palmas como una tortilla. Coloque alrededor de una cucharada de la leche poleada en el medio y cierre las empanadas entre las dos manos sellando bien todos los lados. Repita este proceso para hacer el resto de las empanadas.

En una sartén profunda, agregue suficiente aceite para freír las empanadas. Fría las empanadas a fuego medio hasta que se doren por todos lados. Pongalas sobre toallas de papel para absorban el aceite. Sirva las empanadas calientitas y espolvoreadas con azúcar y canela.


* El aceite de coco no se utiliza tradicionalmente en esta receta, pero creo que añade un delicioso aroma y sabor que complementa los plátanos muy bien. Además, el aceite de coco es muy resistente al calor y mejor para la salud.

DSC_0040

References:
Admin, and Pete Diaz Says. “News.” The Austin Times. N.p., 01 Jan. 1970. Web. 18 Mar.  2017. <http://www.theaustintimes.com/2010/01/the-history-behind-tamales/&gt;.
“Early History of the Banana.” Early History of the Banana. N.p., n.d. Web. 18 Mar. 2017. <http://cwh.ucsc.edu/bananas/Site/Early%20History%20of%20the%20Banana.html&gt;.


My Mom’s Sopa de Res: Salvadorian Beef and Vegetable Soup
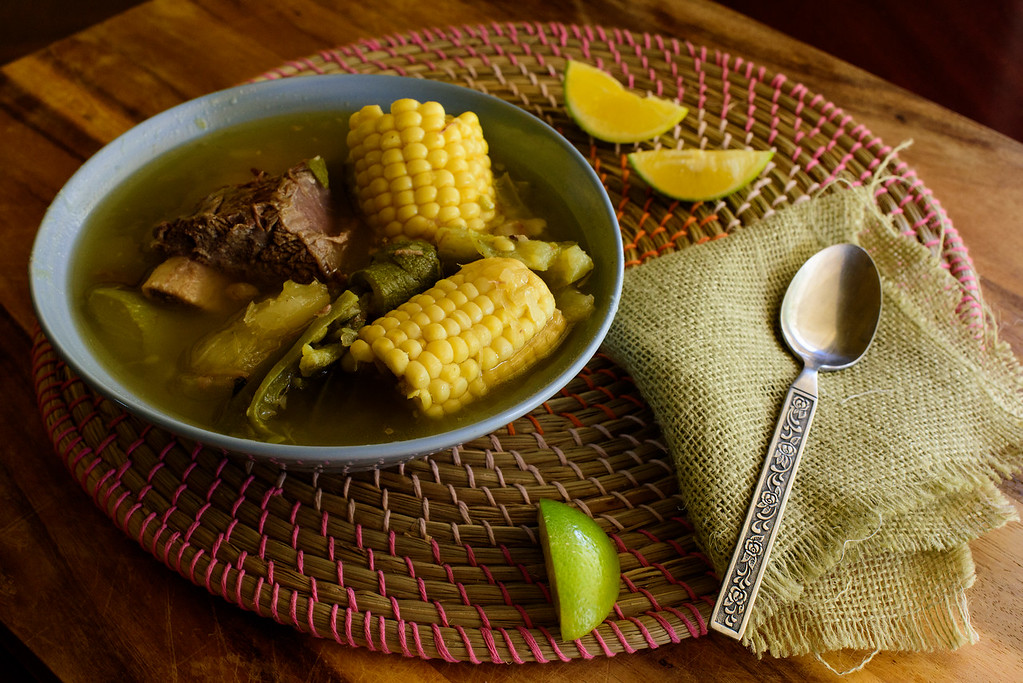
DSC_8819-XL

On days when I’m feeling under the weather, there is nothing more comforting than my mom’s sopa de res. The ingredients are simple, but highly nutritious. It’s made with vegetables that are just “roughly chopped” and beef shanks with bone and all. Bone broth seems to be all the rage nowadays, but using the bones in soups is quite traditional in Salvadorian cooking and for good reasons. I’m not a dietician or scientist, but I can tell you that any soup made like this must, indeed, have some medicinal qualities that cure all sorts of ailments.   Plus, it’s pure comfort food, rustic and surprisingly flavorful. It think it rivals chicken soup in terms of warming your soul and tummy during cold winter months, or just when you need a pick-me-up. It’s easy to make and I’m sure it would be delicious cooked slowly in a crock pot. Just make sure to add the cabbage and squash at the end. However, some mushy vegetables actually are fine with me because I think they add a little more depth and thickness to the soup. It’s all a matter of preference.

Ingredients:

  • 12 cups water
  • 3 lbs beef shanks with bone or short ribs, preferably grass-fed (can add another lb. for a meatier soup)
  • 3 ears of corn, cut into smaller pieces
  • 1 cassava root, peeled and cut into small pieces (can substitute with potatoes)
  • 1/2 cabbage, cut into small wedges
  • 2 Mexican squashes or zucchini, cut into 1-inch pieces
  • 4 small carrots, roughly sliced
  • 1 green bell pepper, chopped
  • 1 small onion, chopped
  • whole sprigs of cilantro and mint, roughly chopped
  • 1 celery stalk, roughly chopped
  • 2 bay leaves
  • Salt & pepper to taste
  • Lime wedges to serve

In a large pot, add water, beef, bay leaves, salt, and pepper. Cook for 2 hours until the beef becomes tender.

Add the corn, cassava, carrots, bell pepper, onion, celery, and herbs. Cook until the cassava is fork tender. Add the cabbage and squash and cook until all the veggies are tender, about 15 more minutes.

Serve with lime wedges.

DSC_8809-XL

En Español

Los días en que no me siento muy bien, no hay nada más reconfortante que la sopa de res de mi mami. Los ingredientes son sencillos, pero muy nutritivos. Está hecha con verduras que son sólo se medio cortan y chamorro de res con el hueso y todo. El caldo de hueso parece estar de moda hoy en día, pero el usar los huesos en sopas es bastante tradicional en la cocina salvadoreña y por buenas razones. No soy una dietista o científica, pero puedo decirte que cualquier sopa hecha de esta manera debe de tener algunas cualidades medicinales que curan todo tipo de dolencias. Además, es un buen caldo reconfortante, rústico y sorprendentemente sabroso. Creo que rivaliza con la sopa de pollo en términos de sus cualidades curativas para el alma y la barriga durante los fríos meses de invierno, o justo cuando necesitas un levantamuertos. Es fácil de hacer y estoy segura de que sería deliciosa cocinada en una olla de cocción lenta. Sólo asegúrese de añadir el repollo y el pipián (calabaza) al final. Sin embargo, las verduras blandas casi deshechas, en mi opinión, ayudan a espesar un poco más la sopa. Todo depende de tu gusto.

Ingredientes:

  • 12 tazas de agua
  • 3 libras de chamorro o costilla de res, preferiblemente de ganado alimentado a pasto (puede agregar otra libra si quiere más carne)
  • 2 elotes, cortadas en trozos
  • 1 yuca, pelada y cortada en trozos pequeños (se puede sustituir con papas)
  • 1/2 repollo, rebanado
  • 2 calabazas, cortadas en trozos de 1 pulgada (en El Salvador se le conoce como pipián)
  • 4 zanahorias pequeñas, cortadas en rodajas
  • 1 chile verde, picado
  • 1 cebolla pequeña, picada
  • Ramitas enteras de cilantro y hierbabuena (menta), medio picaditas
  • 1 tallo de apio, picado
  • 2 hojas de laurel
  • Sal y pimienta al gusto
  • Rodajas de limón verde para servir

En una olla grande, agregue el agua, la carne de res, las hojas de laurel, la sal y la pimienta. Cocine durante 2 horas hasta que la carne esté blanda.

Agregue el elote, la yuca, las zanahorias, el chile, la cebolla, el apio y las hierbas. Cocine hasta que la yuca esté tierna. Añadir el repollo y la calabaza y cocinar hasta que todas las verduras estén tiernas, unos 15 minutos más.

Servir con rodajas de limón.


Zarzuela Catalana & María Luisa Cake

5-DSC_7622

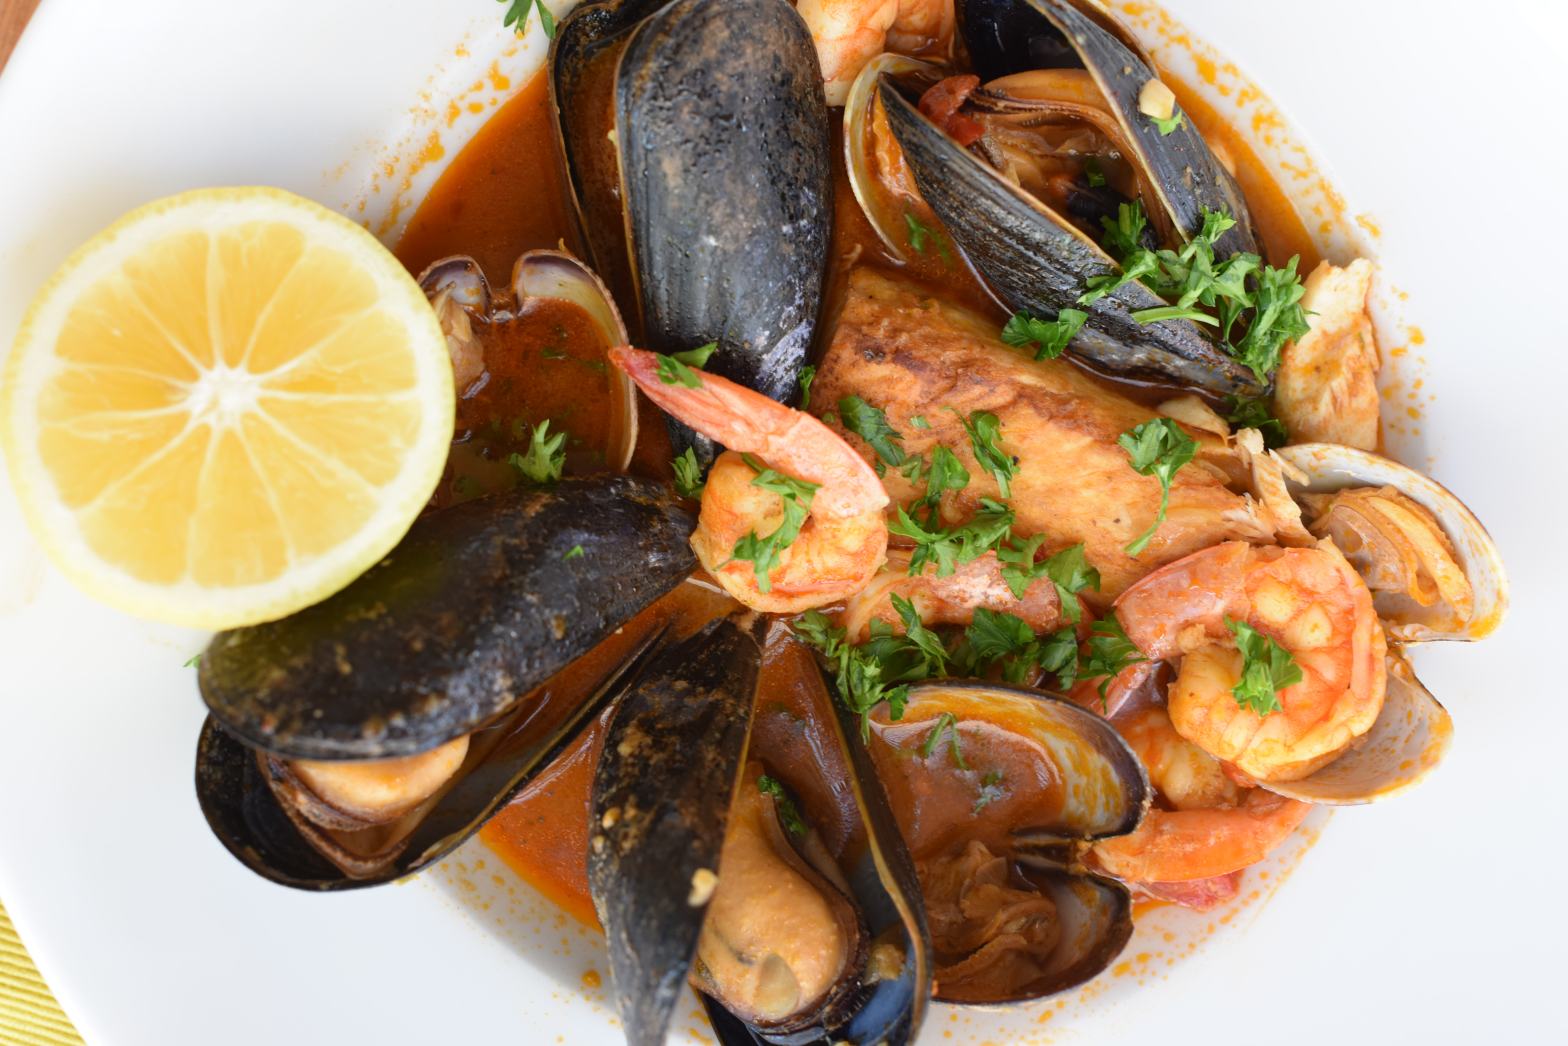
May is the month of birthdays in my family, including my own. Her birthday is on May 1st and this year is the year of multiple events for us: graduation parties, baby showers, etc. So, we decided that for all the May birthdays we would keep it simple, at least for us adults. Well, simple doesn’t mean you cannot make it special. My mom loves seafood. We grew up eating a lot of exotic dishes and plenty of seafood. What better way to celebrate my mom’s birthday than to cook up something with the flavor of the seas.  Sorry land lovers, this post is only for true seafood lovers.

It’s not a Salvadorian recipe, however, we love dishes with a Mediterranean influence and that’s how Latin American food is like, a perfect blend of new and old worlds.It may seem like a complicated dish, but don’t feel intimidated by the process. Seafood cooks really fast and this is definitely something you want to enjoy immediately. Most of the work and time involved is the prep and shopping for ingredients, so it’s certainly a dish for a special and relaxed occasion with friends and family. It’s not a weeknight dinner.

Zarzuela Catalana

For about 6 servings

  • 1 lb. raw shrimp, cleaned, tails intact
  • ½ lb. or 8 oz. firm white fish fillets like cod or mahi mahi, cut into 1-2 inch pieces
  • ½ lb. or 8 oz. mixed seafood like calamari, scallops, etc.
  • 24 or more mussels, cleaned
  • 6-7 cups fish stock (see cooking steps below)
  • 1/3 cup olive oil
  • 1 onion, chopped
  • 1 carrot, chopped
  • 3 celery sticks, chopped
  • 2 bay leaves
  • 2 sprigs of fresh thyme
  • 5 cloves garlic, mashed
  • 1 teaspoon paprika
  • pinch of saffron threads
  • 1 cup white wine
  • 1 tube tomato paste (you may not need all of it)
  • chopped fresh parsley
  • salt and pepper to taste
  • 2 slices day old bread, cubed
  • 5 blanched almonds

Additional ingredients to make a base or fish stock:

½ lb. fish trimmings (such as heads, bones, tails, etc.)

Begin by making a base or fish stock for the stew. Visit your local fish market or grocery store and ask for ½ to 1 lb of fish bones. This is more or less the quantity you need to make about 6 cups of stock. If you end up making more than you need, you can freeze the leftovers for up a to a month.

In a large pot, drizzle olive oil and dump all the fish bones along with onions (reserve some chopped onions for later), celery, carrots, thyme, garlic, and bay leaves. Season with salt and pepper. Squeeze in about half of the tomato paste into the mixture and cook on medium high heat until the onions are caramelized and the tomato paste begins to brown and stick to the pot. Add the wine and deglaze using a plastic or wooden spoon. Pour in about 1.5 liter or 6 cups of water. Give it a stir, and simmer with a lid on for about 20 minutes. Allow it to cool a bit before straining.

The last step to having a great fish base for this dish is to strain the fish bone stock through a fine mesh sieve. This is an important step as you don’t want your family or guests to choke with a fish bone. It can be extremely dangerous, however, you’ll end up with a really rich and smooth fish stock for your fish stew. Store in an airtight container until ready to use.

Now on to the zarzuela…

In a Dutch oven pot or something similar, drizzle some olive oil and add the bread and almonds, stirring until golden. Add crushed garlic during the last minute. Process these ingredients with a handful of fresh parsley and a little fish stock to make a smooth paste. This is known as a picada, which serves as a thickening agent and also adds great taste to your zarzuela. Set aside when done.

Drizzle more olive oil into your pot and brown the fish, shrimp, and mixed seafood in batches, seasoning with salt and pepper each time. It’s important not to overcrowd the pan because that causes any meat or seafood to give off too much liquid and it won’t brown the way you want. Hear the sizzle and get that nice golden color on each piece of seafood. Set aside on a large plate or dish.

Next, add the rest of the onion, garlic, and paprika to the pot. Cook until the onions are tender and translucent. Add the saffron, remaining ½ cup of wine, and tomato paste. Allow the wine to reduce a bit and add about 6 cups of fish stock. Heat and simmer, for about 10-15 minutes to allow the stock to reduce a bit and the flavors to concentrate.

Add the mussels to the stock and simmer, covered, for about 2-3 minutes. Discard any mussels that do not open. Add all the seafood and the picada paste, stirring gently until the sauce has thickened and the seafood has cooked. This only takes about 2-3 more minutes. Season, to taste.

Serve in shallow bowls and garnish with finely chopped parsley and pair up with some crusty baguette slices to soak up all the sauce. Enjoy!

6-DSC_7624

The Birthday Cake

Bella and I had gone on a field trip to Tanaka Farms a couple of days before my mom’s special meal and we picked some beautiful, plump organic strawberries. How perfect for my mom’s birthday since she loves fresh strawberries in cake. I used a recipe for María Luisa cake from My Colombian Recipes blog. The only change I made was I added orange liqueur and orange zest instead of lemon zest. In El Salvador this spongy cake is traditionally made in pastry shops, with a white frosting and red sugar and sort of a pastry cream filling. I wanted something lighter so I just used whipped cream with fresh strawberries and sprinkled the top with confectioner’s sugar. It turned out so delish and it wasn’t overwhelmingly sweet. It’s the Latin American version of a Victoria sponge cake. At the end of the day, my mom had a great time and her little granddaughters did as well. We love parties and get togethers, especially when making fun dishes and desserts is involved. Even Mr. Dinosaur gets in on the action. 

Bella y yo habíamos ido en una excursión a la Granja Tanaka un par de días antes de la comida especial de mi mamá y pudimos recoger unas ricas fresas orgánicas. Muy ideal para el cumpleaños de mi mami ya que a ella le gusta mucho el pastel con fresas. Utilicé una receta de Torta María Luisa del blog Recetas de Colombia. El único cambio que hice fue que añadí licor de naranja y la ralladura de una naranja en vez de ralladura de limón. En El Salvador esta torta esponjosa se hace tradicionalmente en pastelerías, con un turrón blanco y azúcar roja y un tipo de relleno de crema pastelera o leche poleada. Yo quería algo más ligero por lo que utilicé crema batida con fresas frescas y lo espolvoreé con azúcar glas. Resultó tan delicioso este pastel y no fue extremadamente dulce. Es la versión latinoamericana de una la torta inglesa Victoria. Al final del día, mi mami pasó un buen momento y sus pequeñas nietas también. Nos encantan las fiestas y reuniones, especialmente cuando se trata de preparar platos y postres. Es muy divertido. Miren, hasta el Mr. Dinosaurio es parte del festejo.

En Español

Mayo es el mes de los cumpleaños en mi familia, incluyendo el mío. El cumpleaños de mi mamá es el 1 de mayo y este año es el año de múltiples eventos: Día de la Madres, fiestas de graduación, baby shower, etc. Por lo tanto, decidimos que, para todos los cumpleaños de mayo tendríamos algo sencillo, al menos para nosotros los adultos. Bueno, sencillo no quiero decir que no se puede hacer algo especial. Mi mamá adora los mariscos. Crecimos comiendo una gran cantidad de platos exóticos y un montón de mariscos. ¿Qué mejor manera de celebrar el cumpleaños de mi mamá que cocinando algo gustoso y con el sabor del mar. Y para ustedes amantes de la tierra, lo sentimos, este post es sólo para los verdaderos amantes de los mariscos.

Esta no es una receta de El Salvador, sin embargo, nos encantan los platos de influencia mediterránea y así es como la comida latinoamericana es, una mezcla perfecta de mundos nuevos y viejos. Puede parecer como un plato complicado, pero no se sientan intimidados por el proceso. Los mariscos se cocinan muy rápido y este plato es definitivamente algo que se debe disfrutar al instante. Lo que implica la mayor parte del trabajo es la preparación y la compra de los ingredientes, por lo que es sin duda un plato para una ocasión especial y relajada con amigos y familiares. No es una cena de entre semana.

Zarzuela Catalana

Rinde aproximadamente 6 porciones

  • 1 libra de camarones crudos, limpios, con las colas
  • ½ lb u 8 oz filetes de pescado firme blanco como el bacalao o dorado, cortados en trozos de 1-2 pulgadas
  • ½ libras u 8 oz de mariscos mixtos como calamares, vieiras, etc.
  • 24 o más, mejillones limpios o almejas
  • 6-7 tazas de caldo de pescado (ver receta abajo)
  • 1/3 taza de aceite de oliva
  • 1 cebolla picada
  • 1 zanahoria, picada
  • 3 ramas de apio, picadas
  • 2 hojas de laurel
  • 2 ramitas de tomillo fresco
  • 5 dientes de ajo, machacados
  • 1 cucharadita de paprika
  • 1 pizca de hebras de azafrán
  • 1 taza de vino blanco
  • 1 tubo de pasta de tomate (puede que no necesite todo)
  • perejil fresco
  • sal y pimienta al gusto
  • 2 rebanadas de pan viejo, en cubos
  • 5 almendras blanqueadas

Los ingredientes adicionales son para hacer una base o caldo de pescado:

½ lb de espinas y partes de pescado (como cabezas, colas, etc.)

Comience haciendo una base o caldo de pescado para el guiso. Visite su tienda de comestibles o puesto de mariscos local y pedir ½ a 1 libra de huesos de espinas. Esto es más o menos la cantidad que necesita para hacer unas 6 tazas de caldo. Si se termina haciendo más de lo necesario, se puede congelar lo que sobre hasta por un mes.

En una olla grande, rocíe aceite de oliva y eche todos los huesos de pescado junto con la cebolla (reservar un poco de cebolla picada para más tarde) hojas, apio, zanahorias, tomillo, ajo, y hojas de laurel. Condimentar con sal y pimienta. Añada alrededor de la mitad de la pasta de tomate en la olla y cocer a fuego medio hasta que la cebolla esté caramelizada y la pasta de tomate empiece a dorarse y se comience a pegar en la olla. Añadir el vino y raspe la olla usando una cuchara de plástico o de madera. Es una manera de añadir sabor con todo lo que se pega en la olla, siempre y cuando no permita que los ingredientes se quemen.

Verter aproximadamente 1.5 litro o 6 tazas de agua. Revuelva, tape, y cocine a fuego lento durante unos 20 minutos. Deje que el caldo se enfríe un poco antes de colar.

El último paso para tener una buena base de pescado para este plato es colar el caldo de pescado a través de un colador de malla fina. Este es un paso importante, ya que no quiere que su familia o invitados se atoren con una espina de pescado. El resultado después de colar será un suave y rico caldo de pescado para su zarzuela catalana. Reserve en un recipiente hermético hasta que esté listo para su uso.

Para hacer la zarzuela…

A continuación, en una olla horno holandés o algo similar, rocíe un poco de aceite de oliva y añada el pan y las almendras, revolviendo hasta que esté todo dorado. Añadir el ajo picado en el último minuto. Procesar estos ingredientes con un puñado de perejil fresco y un poco de caldo de pescado hasta formar una pasta suave. Esto se conoce como picada en lo que es la cocina catalana y sirve como un espesante en salsas y también da un buen sabor. Esto se le mezcla a la zarzuela al final.

Rocíe más aceite de oliva en la olla y dore el pescado, camarones y mariscos mixtos, un poco a la vez. Si se llena la cazuela demasiado, todo despedirá mucho jugo y no se dorará bien. Sazonar con sal y pimienta. Retirar y reservar en un plato grande.

A continuación, añadir el resto de la cebolla, el ajo, y paprika a la olla. Cocine hasta que la cebolla esté tierna y transparente. Añadir el azafrán, ½ taza restante de vino, y la pasta de tomate. Deje que el vino hierva un poco y añadir alrededor de 6 tazas de caldo de pescado. Cocine a fuego lento, durante unos 10-15 minutos para reducir la salsa un poco y permitir que los sabores se concentren.

Agregar los mejillones a la salsa y cocer a fuego lento, tapado, durante unos 2-3 minutos. Deseche los mejillones que no se abran. Añadir todo el marisco y la picada, revolviendo suavemente hasta que la salsa haya espesado y los mariscos estén cocinados. Esto sólo tarda unos 2-3 minutos más. Sazone al gusto.

Servir en platos poco hondos y decore con perejil finamente picado, acompañados con algunas rebanadas de pan crujiente para absorber toda la salsa. ¡Qué disfrute!


Torrejas de Semana Santa

25479593883_fcdb07d0bd_b

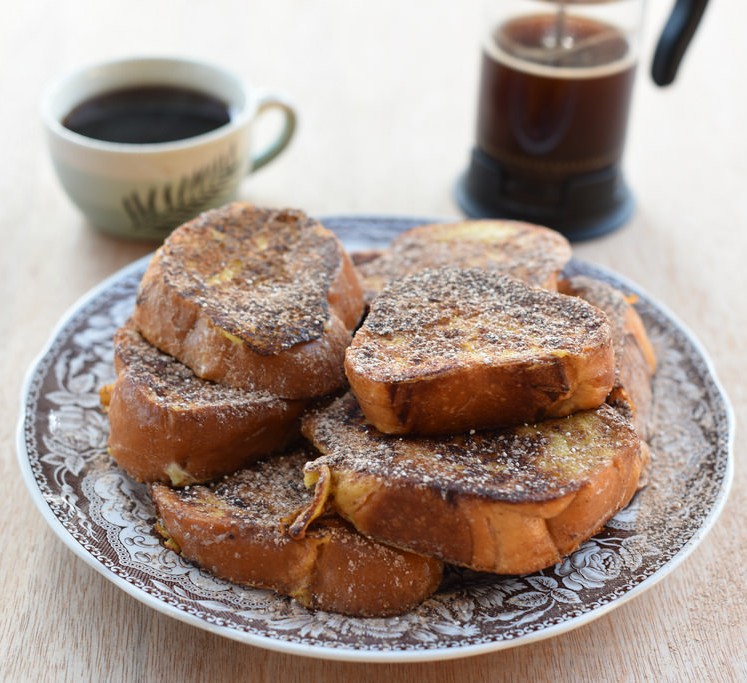
Spring is here and one thing I look forward to is our rose garden. My daughter was so excited to set the table for Easter and the roses looked gorgeous. She’s such a little party planner. 

Our roses have survived many droughts, but this year we saw some hints of El Niño and a little bit of water goes a long way here. These roses have adapted to very little water, but even during dry spells, they never cease to amaze me. We moved into our home about 5 years ago. The previous owners had lived here since the house was built in the 60s and some of the rose bushes are quite old. They smell like roses should, exquisitely. I have to say I’m no expert on roses. All the upkeep we do is just snipping off the old roses and watering them every now and then. Our landscaper likes to chainsaw the bushes sometimes. Perhaps they remind him of someone. I wonder. They are quite sturdy and thorny.

25475981593_fa1d66e734_b25965535702_dbd9691335_b

I love this quote by Shannon L. Alder: “Some of the most beautiful things worth having in your life come wrapped in a crown of thorns.”  


Something else I look forward to around Easter are torrejas. Each country has distinct Easter traditions, and along with every holiday and celebration, there are traditional dishes and desserts. In El Salvador everyone looks forward to Semana Santa. Going to the beach and enjoying a week off from school is what I looked forward to. Visiting my grandma in Coatepeque was always fun and interesting with all the religious processions and the sawdust and salt carpets that covered the streets of that picturesque town. It was so colorful and probably one of the most important times of the year besides Christmas. Traditional dishes include fish and rice, the notorious foods of la Cuaresma or Lent. But what really made me excited was eating my mom’s torrejas, sort of what we know here in the U.S. as French toast. Many countries have their own versions and they are usually served as dessert during Easter. I’m not sure how French toast ended up becoming breakfast here, but I love making them and I don’t mind eating them first thing in the morning. As a kid you have those memories that warm your soul and things you look forward to on special occasions, especially those delectable desserts and recipes that only come once a year.

Torrejas are European in origin with versions found in France and Spain probably dating back to the Middle Ages.  You can use just about any type of day old bread, however, for torrejas an eggy bread works best. I love brioche or challah bread for this recipe. In El Salvador they use a similar bread called torta de yema, or yolk bread. There are countless variations of this dessert all over Latin America and this is not supposed to be a delicate, dainty dessert. You can really have fun with it and try adding flavored liqueurs, jams, syrups, and fillings. It pairs perfectly with a good cup of coffee or some strong tea.

Salvadorian torrejas are usually served in a bath of simple syrup with cinnamon. However, I decided to make the syrup bath optional. When I was a kid I loved to indulge in all that syrupy goodness, but as I grew older my sweet tooth is not as strong, to my advantage. So I decided to serve these just sprinkled with some confectioner’s sugar and powdered cinnamon with agave on the side. It’s a much lighter version, but I prefer it this way now. Of course, you can serve them and eat them as you wish. I also added a little orange liqueur and orange zest, which is my own personal touch. I find that orange liqueur adds a subtle citrusy and fresh undertone to desserts and cakes.

Ingredients:

1 cup milk

4 large eggs

1 teaspoon sugar (optional)

½ teaspoon vanilla or orange liqueur

Pinch of salt

1 loaf brioche or challah bread (or other eggy bread), 1 inch slices

Zest of 1 orange, finely grated

Oil of your choice and butter

Confectioner’s sugar and ground cinnamon for sprinkling

Optional: Maple syrup or cinnamon simple syrup for serving

  1. Warm the milk and orange zest in a saucepan. Allow the milk to cool at room temperature or overnight in the refrigerator.
  2. Beat the milk, eggs, orange liqueur, and pinch of salt in a shallow dish big enough to dip the bread slices in a single layer.
  3. Dip the bread slices in the egg mixture and flip to coat both sides. Allow the bread to soak up the milk for a few minutes.
  4. In the meantime, melt about a tablespoon of butter in a skillet over medium heat. Drizzle some oil as well.
  5. Fry bread slices until golden brown on both sides.
  6. Serving option 1:  Sprinkle with confectioner’s sugar and cinnamon. Drizzle with maple syrup if desired.
  7. Serving option 2: Dip all the slices in cinnamon simple syrup. This last option is very traditional in El Salvador.

Cinnamon Simple Syrup:

2 cups water

1 cup brown sugar (substitute regular sugar if you don’t have brown sugar in your pantry)

1 cinnamon stick

Combine all the ingredients in a saucepan and bring to a boil. Simmer on low heat until it thickens a bit. You do not need to remove the cinnamon stick.

En Español

La primavera está aquí y algo de lo cual me alegro es ver el jardín de rosas florecer. Nuestras rosas han sobrevivido muchas sequías, pero este año nos visitó El Niño con un poquito de lluvia. Estas rosas se han adaptado a muy poca agua, pero incluso aun durante los períodos de sequía, nunca dejan de sorprenderme. Nos vinimos a vivir en nuestra casa hace aproximadamente 5 años. Los dueños anteriores habían vivido aquí desde que la casa fue construida en los años 60 y algunos de los rosales son bastante viejos. Huelen cómo se debe que las rosas huelan, exquisitamente. Tengo que decir que no soy una experta en las rosas. Todo el mantenimiento que les damos es simplemente cortar las rosas marchitas y regarlas de vez en cuando. A nuestro jardinero le gusta motosierrar los arbustos a veces. Tal vez  le recuerdan a alguien. Me pregunto. Son bastante resistentes y espinosos esos arbustos.

Me encanta esta cita por Shannon L. Alder: “Algunas de las cosas más hermosas que valen la pena tener en la vida vienen envueltas en una corona de espinas.”

Otra cosa que yo espero con anticipación alrededor de la Semana Santa son las torrejas. Cada país tiene diferentes tradiciones de Semana Santa, y junto con cada día festivo y celebración, hay platos típicos y postres. En El Salvador todo el mundo espera la Semana Santa para estar de vacaciones e ir a la playa.  Se disfruta de una semana de descanso de la escuela y algunos de trabajo. Visitar a mi abuela en Coatepeque durante la semana santa fue siempre divertido e interesante con todas las procesiones religiosas y las alfombras de aserrín y sal que cubrían las calles de ese pueblo pintoresco. Era tan colorido y probablemente uno de los momentos más importantes del año, además de la Navidad. Los platos tradicionales son el pescado con un arroz, los alimentos notorios de la Cuaresma. Pero lo que realmente me emocionaba era comer las torrejas que hacía mi mamá. Las torrejas son parecidas a lo que en EE.UU. se le dice tostada francesa. Muchos países tienen sus propias versiones y por lo general se sirven como postre durante la Semana Santa o Cuaresma. No estoy segura de cómo la tostada francesa terminó por convertirse en desayuno aquí, pero me encanta hacerlas y comerlas a cualquier hora. Uno tiene recuerdos  de la niñez que nos arrullan el alma y hay cosas que esperamos en ciertas ocasiones, especialmente los deliciosos postres y recetas que sólo vienen una vez al año.

25774353200_307c61a7fc_b

Las torrejas son de origen europeo con versiones que se encuentran en Francia y España y probablemente se remontan a la Edad Media. Usted puede utilizar casi cualquier tipo de pan del día anterior, sin embargo, para las torrejas funciona un pan a base de yema. Me encanta usar brioche o el pan jalá (un pan judío) para esta receta. En El Salvador se utiliza un pan similar que se conoce como torta de yema. Hay un sinnúmero de variaciones de este postre en toda América Latina y no es un postre delicado. Realmente se puede ser creativo y añadir diferentes sabores, mermeladas, jarabes y rellenos. Va muy bien con una buena taza de café o un té.

Las torrejas salvadoreñas se sirven generalmente en un baño de almíbar de canela. Sin embargo, para mí eso es opcional. Cuando era niña me encantaba disfrutar de todo lo que tenía almíbar, pero a medida que fui creciendo mi paladar por lo dulce ya no es tan fuerte, y eso es a mi favor. Así que decidí servir las torrejas sólo espolvoreadas con azúcar glas y canela en polvo con un poquito de agave. Es una versión mucho más ligera, pero la prefiero así ahora. Por supuesto, puede servirlas y comerlas como desee. También le añado un poco de licor de naranja y la ralladura de naranja a la leche lo cual es mi propio toque personal. Encuentro que el licor de naranja añade un matiz cítrico sutil y fresco en los  postres y pasteles.

Ingredientes:

1 taza de leche

4 huevos

1 cucharadita de azúcar (opcional)

½ cucharadita de vainilla o licor de naranja

Pizca de sal

1 pan brioche o jalá (u otro pan a base de yema), rodajas de 1 pulgada

Ralladura de 1 naranja

Aceite de su elección y mantequilla

Azúcar glas y canela en polvo para espolvorear

Opcional: Almíbar de canela para servir o algún otro jarabe


  1. Calentar la leche y la ralladura de naranja en una cacerola. Deje que la leche se enfríe a temperatura ambiental o durante la noche en el refrigerador.
  2. Batir la leche, huevos, licor de naranja, y una pizca de sal en un plato poco profundo lo suficientemente grande como para mojar las rebanadas de pan en una sola capa.
  3. Sumergir las rebanadas de pan en la mezcla de huevo y dar la vuelta para cubrir ambos lados. Deje que el pan absorba la leche durante algunos minutos.
  4. Mientras tanto, derretir una cucharada de mantequilla en una sartén a fuego medio. Rocíe un poco de aceite también.
  5. Poner las rebanadas de pan a freír hasta que estén doradas por ambos lados.

1era opción para servir: Espolvorear con azúcar y canela. Rociar con miel o jarabe si desea.

2da opción: Sumerja todas las rodajas en el almíbar de canela. Esta última opción es muy tradicional en El Salvador.

Almíbar de canela:

2 tazas de agua

1 taza de azúcar morena (sustituir con azúcar regular si no tiene azúcar morena en su despensa)

1 palito de canela

Combinar todos los ingredientes en una pequeña olla y hervir. Cocine a fuego lento hasta que se espese un poco. No es necesario sacar la canela.

Gallo en Chicha

It is so refreshing to finally write a new blog post. Life has been a little crazy lately but for a good reason. We are currently expecting our third baby and this time, it’s a high-risk pregnancy. The baby and I are doing well at 31 weeks, however, I won’t be able to resume my normal activities until after the baby is born. I did manage, however, to cook up a delicious meal right before the doctor said I had to go on a modified bed rest. So now I have a little extra time to kill, therefore, I decided to finally write a new post about the last dish I cooked. I have craved this rustic chicken dish a few times during this pregnancy. Really, all throughout this pregnancy I have been craving many old time Salvadorian dishes that my mom used to make when we lived in El Salvador.

The word gallo means rooster. Chicha is an alcoholic drink made from maize, panela, and pineapple. Most countries in Latin America have their own versions. My mom used to make gallo en chicha with beer because it was more practical. Old recipes for this chicken stew ask you to actually kill a rooster, clean it, and then cook it. However, living in a typical suburban American town, not close to any farms, I had to make a few improvisations. First of all, I used a store-bought chicken, and wine instead of chicha. I’m pretty sure that an organic chicken would be even tastier and closer to a rooster. When I was a kid, this was my dad’s favorite dish to eat on New Year’s Eve, which happens to be his birthday. So, my mom would buy a live organic rooster that would hang out freely in our backyard for a month before becoming our New Year’s Eve dinner.

As a foodie/historian I always like to research the origins of old, traditional recipes. What I find interesting about gallo en chicha is the addition of prunes. It’s the surprising ingredient that no one expects in a Salvadorian dish. But just as many other Latin American cuisines, Salvadorian food is a fusion of both old and new world ingredients. Prunes and apricots in chicken stews come from the Moroccan & Arab influence on Spanish cuisine. The presence of tomatoes and peppers in the sauce are representative of our Mesoamerican roots.  The richness and  complexity of all the spices along with the olives and prunes make this dish a fine competitor among the more famous chicken stews like coq au vin and chicken tagine.

Gallo en Chica

Gallo En Chicha

Serves 6

4 Roma tomatoes
1 onion, quartered
1 green bell pepper, deseeded and quartered
1 garlic clove, peeled
2 teaspoons sesame seeds
2 teaspoons pumpkin seeds
1 teaspoon of dried thyme
1 bay leaf
Grape seed oil
1 whole chicken or about 5 lbs. of chicken pieces
1 ½ cups red wine* (Cabernet Sauvignon or Merlot), or 1 12 oz. can of beer
1 cup chicken stock
¼ cup brown sugar or chopped panela (it’s like brown sugar but in solid form)
½  tablet Mexican chocolate, chopped (optional)
1 ½ tablespoons capers with brine
10 Spanish olives stuffed with pimientos
12 pitted prunes
Salt & pepper to taste

* I often use Charles Shaw wines for cooking. They are cheap, yet good quality, sold at Trader Joe’s.

Preheat the oven to 350º F. Place the tomatoes, onion, bell pepper, sesame seeds, pumpkin seeds, bay leaf, and thyme on a baking sheet. Drizzle with oil and toss together. Roast the veggies and spice mixture in the oven for about 25 minutes.

Meanwhile, cut the whole chicken into pieces and season with salt and pepper. Drizzle a frying pan with some oil and brown the chicken pieces. Transfer the browned chicken to a slow cooker or crock-pot. Dump or reserve the excess oil/fat and then deglaze the pan with the wine until the wine comes to a fast boil. Make sure to scrape off all the little bits and pieces, which will add more flavor to the sauce. Pour the boiling wine over the chicken.

Put the roasted tomatoes, onion, bell pepper, sesame seeds, pumpkin seeds, thyme, bay leaf, and chicken stock in a blender. Blend until you have a very smooth sauce and then pour it over the chicken.

The last step is to add the brown sugar, capers, olives, and prunes. Cook on low for 4-5 hours* if you are using a slow cooker. Taste and add more salt if necessary. Serve with white or brown rice along with some crusty bread to soak up the lovely, sweet & savory sauce.

*If you prefer to cook the chicken stew in a regular pot on the stovetop, bring it to a boil and then cook on low heat for about 1 ½ hours.

Gallo en chicha

En Español 

Es tan estimulante poder finalmente escribir una nueva entrada en el blog. La vida ha sido un poco loca últimamente, pero por una buena razón. Actualmente estamos esperando nuestra tercer bebé y esta vez, se trata de un embarazo de alto riesgo. La bebé y yo estamos bien a las 31 semanas, sin embargo, no voy a ser capaz de reanudar mis actividades normales hasta después de que nazca la bebé. Sin embargo, pude cocinar una deliciosa comida justo antes de que mi doctora me dijera que tenía que estar en reposo en cama. Así que ahora para matar un poco de tiempo, decidí finalmente escribir un nuevo post sobre el último plato que cociné. Este plato de pollo rústico se me antojado varias veces durante este embarazo. Realmente, todo a lo largo de este embarazo se me han apetecido muchos platos salvadoreños de antaño que mi mamá solía cocinar cuando vivíamos en El Salvador.

La chicha es una bebida alcohólica hecha de maíz, panela y piña. La mayoría de los países de América Latina tienen sus propias versiones. Mi mamá solía cocinar el gallo en chicha con cerveza porque era un poco más practico. Las recetas antiguas para este guiso de pollo piden que realmente se mate un gallo. Sin embargo, viviendo en una típica cuidad estadounidense suburbana, no se hace fácil visitar una granja, así es que tuve que hacer algunas improvisaciones. En primer lugar, compré un pollo entero en la tienda, y usé vino en vez de chicha. Estoy bastante segura de que un pollo orgánico sería aún más gustoso y el sabor más cercano al gallo. Cuando yo estaba pequeña, éste era el plato favorito de mi papá para comer en la víspera del Año Nuevo, que es también cuando él cumple años. Por lo tanto, mi mamá conseguía un gallo orgánico vivo, el cual pasaba al aire libre en el patio de nuestra casa durante un mes antes de convertirse en la cena de nuestro fin de año.

Como una verdadera aficionada de la comida e historiadora siempre me gusta investigar los orígenes de antiguas recetas tradicionales. Lo que me parece interesante del gallo en chicha es la adición de las ciruelas pasas o secas. Es el ingrediente sorprendente que nadie espera en un plato salvadoreño. Pero al igual que muchas otras cocinas latinoamericanas, la comida salvadoreña es una fusión de los ingredientes del viejo y nuevo mundo. Las ciruelas pasas y albaricoques en guisos de pollo provienen de la influencia marroquí y árabe en la cocina española. La presencia de los tomates y los chiles en la salsa son representativos de nuestras raíces mesoamericanas. La riqueza y la complejidad de todas las especias, junto con las aceitunas y las ciruelas hacen de este plato un buen competidor entre los más famosos guisos de pollo como coq au vin francés y tajine de pollo.

Gallo en chicha

Para 6 personas

4 tomates Roma
1 cebolla, cortada en cuartos
1 chile verde, sin semillas y en cuartos
1 diente de ajo, pelado
2 cucharaditas de ajonjolí (semillas de sésamo)
2 cucharaditas de pepitoria (semillas de calabaza)
1 cucharadita de tomillo seco
1 hoja de laurel
Aceite de semilla de uva
1 pollo entero o alrededor de 5 libras de piezas de pollo
1 ½ tazas de vino tinto * (Cabernet Sauvignon o Merlot), o una lata de cerveza de 12 oz.
1 taza de caldo de pollo
¼ taza de azúcar morena o dulce panela picado (es como el azúcar morena, pero en forma sólida)
½ tableta de chocolate mexicano, picado (opcional)
1 ½ cucharadas de alcaparras con su liquido
10 aceitunas españolas rellenas de pimientos
12 ciruelas pasas sin semilla
Sal y pimienta al gusto

* A menudo utilizo vinos Charles Shaw para cocinar. Son baratos, pero de buena calidad, que se venden en Trader Joe’s.

Precalentar el horno a 350º F. Coloque los tomates, la cebolla, el chile verde, semillas de ajonjolí, pepitoria, la hoja de laurel y tomillo sobre una bandeja para hornear. Rocíe con aceite y mezcle todo junto. Asar las verduras y la mezcla de especias en el horno durante unos 25 minutos.

Mientras tanto, partir el pollo en piezas y sazonar con sal y pimienta. Rocíe una sartén con un poco de aceite y dore las piezas de pollo. Transfiera el pollo dorado a una olla de cocción lenta. Deseche o reserve el exceso de aceite o grasa y luego desgrasar la sartén con el vino hasta que el vino hierva rápido. Asegúrese de raspar todos los pedacitos de pollo que quedaron en la cacerola, lo que añadirá más sabor a la salsa. Vierta el vino hirviendo sobre el pollo.

Ponga los tomates asados, cebolla, chile verde, semillas de ajonjolí, pepitoria, el tomillo, el laurel, y caldo de pollo en una licuadora. Licúe hasta obtener una salsa tersa y luego vierta sobre el pollo.

El último paso es añadir el azúcar morena, alcaparras, aceitunas y ciruelas pasas. Cocine a temperatura baja durante 4-5 horas * si está utilizando una olla de cocción lenta. Pruebe y agregue más sal si es necesario. Sirva con arroz blanco o integral, junto con un poco de pan crujiente para absorber la exquisita salsa, dulce y salada a la vez.

* Si usted prefiere cocinar el guiso de pollo en una olla normal en la estufa, deje que rompa hervor y luego cocine a fuego lento durante aproximadamente 1 hora y media.


Pollo Guisado: Salvadorian Chicken Stew

Pollo Guisado

There’s chicken soup for the soul, but this chicken stew deserves a high rating on the comfort scale. Chicken stew is one of those homey dishes that everyone loves. It’s so rustic and warming and most cultures I know have their own versions. From curries to Ethiopian doro wat, and let’s not forget chicken and dumplings, one of my Southern favorites. Too bad Cracker Barrel does not exist in California.

All over the world, chicken stew is always heartwarming and welcoming. This Salvadorian version is full of flavor with an exotic spice mix, representing the flavors that our ancestors loved plus those brought from the Mediterranean and Asian lands by the Spanish conquistadors.

I made it in the slow cooker because we had an afternoon outing planned and it was convenient and economical. However, if you’re making it on the stovetop, simply cook the stew for about 30 minutes on medium-low heat if using boneless chicken. I’m a busy mom so I often buy boneless chicken breasts and thighs because they cook fast. I only get whole chickens if I’m planning to roast them in the oven.

Ingredients:

8 chicken thighs, or combination of different chicken parts
4 Roma tomatoes, quartered
1/2 onion, roughly chopped
2 garlic cloves, peeled
1/2 green bell pepper, roughly chopped
1/2 cup chicken stock
1/2 cup white wine
2 Yukon gold potatoes, unpeeled and cubed
2 carrots, unpeeled and sliced into discs
Salt and pepper
Good quality oil for browning the chicken

Spice Mix (similar to Holiday Turkey):

1 tablespoon pumpkin seeds
1 tablespoon sesame seeds
2 whole cloves
1 bay leaf
1 teaspoon oregano
1/4 teaspoon whole allspice
1/2 teaspoon dried thyme
1/4 teaspoon ground cumin

Heat oil in a skillet. Season the chicken with salt and pepper and brown it on medium-high heat. Place the chicken in your slow cooker (if using) and prepare the sauce.

To make the sauce, saute the tomatoes, garlic, onion, and bell pepper in the same skillet where you browned the chicken. Pop them in the blender and let them hang out until you add the spices. Lightly brown all spice mix ingredients together over medium heat and spoon them out into the blender (browning or lightly toasting spices helps to intensify the flavors). Add chicken stock and blend the sauce until smooth. Pour it over the chicken in the slow cooker. Deglaze the skillet with the wine and pour the juices in the slow cooker. Finally, add the carrots and potatoes. Season with salt and pepper and stir to mix all the ingredients. Cover and cook on low temperature for at least 3 1/2 hours or until the chicken is fully cooked. Serve with rice or salad if you wish.

Pollo Guisado

 En Español

Hay sopa de pollo para el alma, pero este guiso de pollo merece una alta calificación en la escala de comidas consoladoras. El pollo guisado es uno de esos platos hogareños que todo el mundo ama. Es muy rústico y acogedor y la mayoría de las culturas que conozco tienen sus propias versiones. Desde curry a doro wat etíope, y no nos olvidemos de pollo con bolitas de masa, uno de mis platos favoritos del sur de este país. Lástima que Cracker Barrel no existe en California.

En todo el mundo, el estofado de pollo siempre es reconfortante y acogedor. Esta versión Salvadoreña está llena de sabor con una mezcla de especias exóticas, que representa a los sabores heredados de nuestros antepasados ​más lo traído desde el Mediterráneo y las tierras de Asia por los conquistadores españoles.

Lo hice en la olla de cocción lenta, porque teníamos que salir en la tarde y fue una manera conveniente y económica de hacer la cena. Sin embargo, si usted va a cocinar esta receta en la estufa, basta con cocinar el guiso durante unos 30 minutos a fuego lento si utiliza pollo sin hueso. Soy una mamá muy ocupada, así que casi siempre compro pechugas y entrepiernas de pollo deshuesadas ​​porque se cocinan rápido. Solo compro pollos enteros si tengo la intención de rostizarlos en el horno.

Ingredientes:

8 entrepiernas de pollo, o combinación de diferentes piezas de pollo
4 tomates Roma, en cuartos
1/2 cebolla, cortada en pedazos
2 dientes de ajo, pelados
1/2 chile verde, picado en trozos
1/2 taza de caldo de pollo
1/2 taza de vino blanco
2 papas Yukon gold, sin pelar y cortadas en cubos
2 zanahorias sin pelar y cortadas en discos
Sal y pimienta
Aceite de buena calidad para dorar el pollo

Mezcla de especias o relajo (similar a Holiday Turkey):

1 cucharada de semillas de calabaza (ayote)
1 cucharada de semillas de ajonjolí
2 clavos enteros
1 hoja de laurel
1 cucharadita de orégano
1/4 cucharadita de pimienta gorda entera
1/2 cucharadita de tomillo seco
1/4 cucharadita de comino molido

Caliente el aceite en una sartén. Sazone el pollo con sal y pimienta y dore a fuego medio-alto. Coloque el pollo en su olla de cocción lenta (si se utiliza) y prepare la salsa.

Para hacer la salsa, fría los tomates, el ajo, la cebolla y el chile en la misma sartén donde doró el pollo. Pongalos en la licuadora y déjelos reposar hasta que agregue las especias. Ligeramente dore la mezcla de especias a fuego mediano y añada a los ingredientes en la licuadora (el dorar o tostar ligeramente las especias ayuda a intensificar los sabores). Agregue el caldo de pollo y licue la salsa hasta que quede suave. Vierta sobre el pollo en la olla de cocción lenta. Desglase la sartén con el vino y vierta el jugo en la olla. Por último, añada la zanahoria y las papas. Sazone con sal y pimienta y revuelva para mezclar todos los ingredientes. Tape y cocine a temperatura baja durante por lo menos 3 horas y 1/2 o hasta que el pollo esté bien cocido. Sirva con arroz y ensalada se desea.


Summer Stuffed Tomatoes & Parmesan Crisps

Summer Stuffed Tomatoes

Consider this post a sequel to Farmer’s Market & Stuffed Bell Peppers. I stuffed these meaty beefsteak tomatoes I got from the Farmer’s Market with leftover meat filling that I had previously prepared to stuff bell peppers. I guess I was on a rellenos kick. I love stuffed vegetables because the flavors get all infused into the meat filling. And what’s better than summer tomatoes? Oh my goodness! So juicy and sweet. Total seasonal perfection.   If you’ve had a chance to look at other recipes throughout this blog, you can definitely see that a lot of Salvadorian dishes are predominantly based on tomatoey sauces. There’s a good reason for that. Besides corn, peppers, and squash, tomatoes are another staple crop in Mesoamerican cooking. You can thank the Aztecs and Maya for domesticating tomatoes. Without their farming expertise there wouldn’t be pizza sauce or ketchup.

Summer Stuffed Tomatoes

Ingredients:

Meat Filling (for 8 tomatoes or bell peppers)
4-8 beefsteak tomatoes (I only had to make 4 for my little family)
1 cup mozzarella or fontina cheese, grated
Olive oil for drizzling

Preheat the oven to 400 F. Slice the tops off the tomatoes and scoop out the pulp with a spoon. Use a small knife to cut around the inside of the tomato to make scooping of the pulp easier. Save the tomato pulp to make some salsa later. Spoon in the filling, pressing it down with the back of the spoon to compact it. Top with shredded mozzarella and cover with tomato lids. Drizzle with olive oil and bake for 15 minutes or until the tomatoes are slightly roasted and the cheese is melted.

Parmesan Crisps

For the Parmesan Crisps, I used a recipe by Giada de Laurentiis and I added freshly ground pepper to some of them. The inspiration actually came from a stand at the Farmer’s Market where they sell Parmesan crisps in many flavors, like black pepper, which is our favorite. You can pretty much add any herbs and spices you’d like. We’ve used them in place of croutons in salads and we eat them as snacks. Parmesan Crisps pair so perfectly with tomatoes. They add a nice saltiness that counterbalance the sweetness and tartness of the stuffed tomatoes.

En Español

Este post es una secuela de Farmer’s Market & Stuffed Bell Peppers. Rellené estos ricos tomates grandes de ensalada que conseguí en el mercado de agricultores con el mismo relleno de carne que me sobró cuando hice chiles rellenos. Supongo que se me antojaron mucho los rellenos. Me encantan los rellenos porque los sabores de las verduras se infunden tan deliciosamente en la carne. ¿Y que es mejor que los tomates de verano? Son tan jugosos y dulces. Una total perfección de la temporada (aquí es los Estados Unidos los tomates estan es su temporada durante el verano). Si usted ha tenido la oportunidad de ver otras recetas a través de este blog, definitivamente se puede ver que un montón de platos salvadoreños se basan predominantemente en salsas de tomate. Hay una buena razón para ello. Además del maíz, chiles y ayote, los tomates son otro alimento básico en la cocina mesoamericana. Usted puede agradecer a los aztecas y los mayas por la domesticación de los tomates. Sin su experiencia en agricultura no habría salsa para pizza ni ketchup.

Summer Stuffed Tomatoes

Ingredientes:

Relleno de carne (para 8 tomates o pimientos)
4-8 tomates biftec (sólo tuve que hacer 4 para mi pequeña familia)
Mozzarella 1 taza o queso fontina rallado
El aceite de oliva de la llovizna

Precaliente el horno a 400 F (aprox. 204 C).Corte las tapas de los tomates y saque la pulpa con una cuchara. Utilice un cuchillo pequeño para cortar alrededor de la parte interior del tomate y así poder sacar la pulpa más fácilmente. Guarde la pulpa de tomate para hacer una salsa después. Llene los tomates con en el relleno, presionando con la parte de atrás de la cuchara para compactarlo. Cubra con queso rallado y con las tapas de tomate. Rocíe con aceite de oliva y hornee por 15 minutos o hasta que los tomates estén ligeramente asados y el queso esté derretido.

Summer Stuffed Tomatoes

Chips de queso parmesano

Para los chips de queso parmesano, usé una receta por Giada de Laurentiis (haz click aquí para ver una versión en español) y añadí pimienta recién molida. La inspiración vino realmente de un puesto en el mercado de agricultores donde venden chips de queso parmesano en muchos sabores, como de pimienta negra, que es nuestro sabor favorito. Los hemos utilizado en lugar de pan frito en ensaladas. Estos chips de queso parmesano se complementan perfectamente con los tomates. Añaden un agradable sabor saladito que contrarresta el dulzor y la acidez de los tomates rellenos.