Rosemary & Balsamic Pork Chops

Rosemary and Balsamic Porkchops

Pork chops can be a little intimidating. The main problem is obtaining juicy, done right pork chops. I have to admit, I’m not brave enough to grill pork chops mostly out of fear of ending up with rubbery, dry meat. But I’ve come up with this recipe that works every single time. It has become a favorite throughout the years. The trick is to marinate the pork chops with some kind of acid like vinegar or sour orange juice for at least 30 minutes. Bone-in pork chops will turn out juicier and more tender than pork loin chops without the bones.

Rosemary and Balsamic Porkchops

Ingredients:

3-4 thick pork chops
1/4 cup balsamic vinegar
1 heaping tablespoon fresh rosemary, coarsely chopped
Salt and pepper
Good quality oil to brown the pork chops

Place the pork chops in a large ziplock bag with the vinegar, rosemary, salt, and pepper. Shake the bag to coat all the pork chops with the vinegar. Place the bag in a bowl and pop it in the fridge. Allow it to marinate for at least 30 minutes.

When ready to cook, heat some oil in a pan and brown the pork chops on both sides over medium-high heat. Make sure the pork chops have a little extra room in the pan because crowding causes the juices to be released too soon. What you’re doing is searing the pork chops to seal in all the juices.

Reduce the heat to low, cover, and cook for 20 minutes. The pork chops will release a lot of liquid which is all the sauce you need at the end. There’s no need to make extra gravy, as long as the pork chops are not overcooked. Of course, you can always douse the pork chops with some gravy if they do turn out a bit too dry.

Rosemary and Balsamic Porkchops

En Español 

Las chuletas de cerdo pueden ser un poco difíciles de cocinar. El problema principal es obtener chuletas jugosas y bien cocinadas. Tengo que admitir que no soy lo suficientemente valiente como para asar chuletas de cerdo porque temo que queden muy resecas. A nadie le gusta comer hule y por esa razón he formulado esta receta que funciona cada vez. Se ha convertido en una de las favoritas de mi familia a través de los años. El truco consiste en marinar las chuletas de cerdo con algún tipo de ácido como vinagre o jugo de naranja agria por lo menos unos 30 minutos. Las chuletas de cerdo con hueso resultarán más jugosas y más blandas que las chuletas de lomo de cerdo sin hueso.

Ingredientes:

3-4 chuletas de cerdo gruesas
1/4 taza de vinagre balsámico
1 cucharada colmada de romero fresco, picado en trozos grandes
Sal y pimienta
Aceite de buena calidad para dorar las chuletas de cerdo

Coloque las chuletas de cerdo en una bolsa ziploc grande con el vinagre, romero, sal y pimienta. Agite la bolsa para cubrir todas las chuletas de cerdo con el vinagre. Coloque la bolsa en un recipiente y pongalas en la refrigeradora. Deje que se marinen por lo menos unos 30 minutos.

Cuando esté listo para cocinar las chuletas, caliente un poco de aceite en una sartén y dore las chuletas por ambos lados a fuego medio-alto. Asegúrese de que las chuletas de cerdo no estén apretadas en la cacerola, porque eso causará que despidan su jugo muy pronto. Este es el proceso de abrasar (soasar) las chuletas de cerdo para sellar todos los jugos.

Reduzca a fuego lento, tape y cocine por 20 minutos. Las chuletas de cerdo despedirán mucho líquido por lo cual no necesitará hacer ninguna otra salsa, siempre y cuando las chuletas no se cocinen demasiado. Por supuesto, puede bañar las chuletas de cerdo con un poco de salsa si le resultan un poco secas.


Advertisement

The Farmers Market & Stuffed Bell Peppers

farmers market I love the farmers market at the Irvine Park. The produce is so beautiful and fresh. The fruits and veggies just pop with color. It’s nature at its best, especially because it’s edible. You also find unusual vendors and all kinds of delicious, gourmet treats, like Welsh meat pies. My daughter Bella loves sampling all the goodies at farmers markets. It’s funny how she tries new things when we go there, but at home she’s not as adventurous. It’s all about having a wide variety of choices for her. She gets to be part of the whole experience. We practice counting the vegetables and placing them in the shopping bag. We name all the items we see and she’s also starting to understand that we have to pay for things. Seasonal organic produce is full of flavor and life. One thing I love about summer and living here in Cali is that we can enjoy fresh produce almost all year round.

Stuffed Bell Peppers

Traditionally, rellenos, or stuffed vegetables, are dipped in egg batter then fried. However, here’s a healthier and quicker alternative. For typical chiles rellenos we use pasilla or similar peppers, but I decided to use these colorful bell peppers instead. I didn’t think the traditional tomato sauce was needed either. They were delicious without any sauce. Our local farmers market bounty was definitely put to good use.

stuffed bell peppers

Ingredients:

4-8 bell peppers (I only needed to make 4 so I saved the rest of the meat filling for lettuce wraps the next day)
1.3 lb ground turkey (1 package)
1 carrot, diced
1/2 onion, chopped
1/2 can garbanzo beans
1/2 can green pigeon peas or gandules (save the rest to make another dish)
1 teaspoon achiote powder
1/2 cup white wine
Salt and pepper to taste
Good quality oil to brown the meat
1 cup shredded mozzarella (use more if needed)

Preheat your oven to 400 F. Roast the bell peppers over a gas flame stove or grill. Place them in a glass bowl and cover with plastic wrap. Meanwhile, heat oil in a pan and add the meat, diced carrot and chopped onion. Season with salt and pepper. Stir and break up the meat. When the meat begins to brown, add the wine, garbanzos, pigeon peas, and achiote. Stir and continue to cook until the wine is absorbed.

Peel the bell peppers by using paper towels to wipe off the skins. It’s not a big deal if some of the skins are left on the peppers. Cut a T-shaped slit on each pepper with a small knife and remove the seeds carefully without tearing the bell peppers apart. Rinse the peppers under cold water and pat them dry with paper towel.

Fill each pepper by spooning some meat filling into all the cavities of the pepper. Top with shredded cheese and place them in an oiled baking dish. Bake them at 400 F for 15 minutes.

 En Español

Me encanta ir al farmers market en el Parque de Irvine. Un farmers market aquí en los Estados se refiere a un mercado al aire libre de agricultores locales. Las verduras son tan hermosas y frescas. Las frutas y vegetales resaltan con color. Es la naturaleza en su mejor momento, sobre todo porque es comestible. También se encuentran vendedores peculiares y todo tipo de deliciosos antojos gourmet, como las empanadas de carne de Gales. Mi hija Bella disfruta mucho probar todas las muestras. Es curioso cómo ella prueba cosas nuevas cuando vamos allí, pero en casa no es tan aventurera. Todo es cuestión de tener una gran variedad de opciones para ella. En el mercado, ella es parte de toda la experiencia. Practicamos contar los vegetales y colocarlos en la bolsa de los comprados. Nombramos todas las cosas que vemos y también ella está empezando a comprender que tenemos que pagar por las cosas.   Los productos orgánicos en su temporada son tan llenos de sabor y vida. Una cosa que me encanta del verano y de vivir aquí en California es disfrutar de todos los productos frescos disponibles durante casi todo el año.

Chiles Rellenos

Tradicionalmente, los rellenos de verduras se sumergen en huevo batido y luego son fritos. Sin embargo, aquí hay una alternativa más saludable y rápida. Para chiles rellenos típicos usamos chiles pasilla (guaque) o algo similar, pero decidí usar estos chiles de color en su lugar. Tampoco creo que la salsa de tomate típica es necesaria para estos chiles rellenos. Son deliciosos en seco. Sin duda hicimos buen uso de las verduras del mercado de nuestros agricultores locales.

stuffed bell peppers

Ingredientes:

4-8 pimientos (yo sólo necesitaba hacer 4 así que guardé el resto del relleno de carne para hacer wraps de lechuga al siguiente día)
1.3 libras de pavo molido (1 paquete)
1 zanahoria, cortada en cubitos
1/2 cebolla, picada
1/2 lata de garbanzos
1/2 lata de gandules (guarde el resto para hacer otra receta)
1 cucharadita de polvo de achiote
1/2 taza de vino blanco
Sal y pimienta al gusto
Aceite de buena calidad para dorar la carne
1 taza de Mozzarella rallado (usar más si es necesario)

Precaliente el horno a 400 F. Ase los chile en una estufa de llama de gas o parrilla. Coloquelos en un recipiente de vidrio y cubra con plástico. Mientras tanto, caliente el aceite en una sartén y agregue la carne, la zanahoria y la cebolla. Sazone con sal y pimienta. Revuelva y deshaga bien la carne. Cuando la carne empiece a dorarse, añada el vino, garbanzos, gandules y achiote. Revuelva y continúe la cocción hasta que se absorba el vino.

Pele los chiles usando papel toalla. No es un gran problema si algunos pedacitos de cáscara son dejados en los chiles. Haga un corte en forma de T en cada chile con un cuchillo pequeño y quite las semillas cuidadosamente sin romper los chiles. Lave los chiles con agua fría y seque ligeramente con papel toalla.

Rellene cada chile con carne usando una cuchara para poder rellenar bien todas las cavidades de los chiles. Termine cubriendo con el queso rallado y coloque los chiles en una fuente de horno engrasada con aceite. Hornee a 400 ° F durante 15 minutos.

Rellenos

Rellenos are stuffed vegetables dipped in egg batter, fried, then cooked in a light tomato sauce. Salvadorians make rellenos out of any vegetable like green beans, potatoes, squash, peppers, etc. They are so good, and often stuffed with cheese or meat. The tomatoey sauce pairs perfectly with rice. Here is a recipe for two types of rellenos. I decided to make vegetarian rellenos de papa and rellenos de güisquil.

Güisquil or chayote can be found in Latino or international markets, although some conventional grocery stores may carry them as well. It is known as chayote in Mexico and mirliton in Louisiana. It tastes sort of like squash but with a crispy texture. To prepare it, you must first peel it because the skins are too tough to eat.

Ingredients for 8 rellenos: 

1 large russet potato
1 güisquil or chayote
2 eggs
1 tablespoon flour (use quinoa flour for gluten-free diets)
8 slices mozzarella cheese
Good quality oil for frying

Start off by cooking the potato in salted water until it’s fork tender. Cool and peel off skin using a small paring knife. Peel the raw güisquil with a vegetable peeler. Slice both the potato and güisquil into thin slices. To assemble rellenos, place 1 slice of mozzarella cheese in between 2 slices of the vegetable. Repeat the process until you have approximately 4 or more rellenos of each vegetable.

Next, separate the egg whites and beat until foamy, increasing the mixer speed gradually until the batter is fluffy like meringue. It doesn’t matter what kind of mixer you have. My mom used to do this with just a fork back in the day.

Add the egg yolks and flour and mix until the egg batter is yellow and creamy but do not overmix. Heat about 1/3 cup oil in a pan. Dip each relleno in the egg batter and carefully slide them into the hot oil in the pan, one at a time. You may have to work in batches.

Fry the rellenos over medium heat until golden, about 1 or 2 minutes per side. Remove with a slotted spoon and drain excess oil on paper towel. Immerse the rellenos in a light tomato sauce (see recipe below) and cook on medium heat for 15 minutes or until the cheese is melted and the vegetables are tender.

Traditional Salvadorian Tomato Sauce for Rellenos & Other Dishes:

4 tomatoes, boiled in water
1 cup chicken stock 1 garlic clove, mashed (optional)
1/2 onion, chopped
1/2 bell pepper (any color), chopped
1/2 teaspoon oregano
Salt & pepper to taste

Cook the tomatoes in water and boil for a couple of minutes. Drain the water, place the unpeeled tomatoes in a blender with chicken stock, and set aside. Saute onions, bell pepper, and garlic in a little bit of oil. Season with oregano, salt, and pepper. Blend all of the ingredients and pour the sauce into a pan. Bring it to a boil then turn the heat to low to keep it warm until ready to use.

En Español

Los rellenos son vegetales rellenos, envueltos en huevo batido, fritos, y cocinados en salsa de tomate. Los Salvadoreños hacen rellenos de cualquier vegetal o verdura como ejotes, papas, calabacines, chiles, etc. Son muy ricos, y a menudo son rellenos de queso o carne. La salsita de tomate se acompaña muy bien con arroz. Esta es una receta para dos tipos de rellenos. Decidí hacer rellenos vegetarianos de papa y rellenos de güisquil.

En los Estados el güisquil o chayote se puede encontrar en los mercados latinos o internacionales, aunque algunos supermercados convencionales también los venden. Se le conoce como chayote en México y mirliton en Louisiana. Su sabor es algo así como el calabacín, pero con una textura crujiente. Para prepararlo, primero debe pelarlo porque la cáscara es muy gruesa para comer.

Ingredientes para 8 rellenos:

1 papa grande
1 güisquil o chayote
2 huevos
1 cucharada de harina (harina de quinua para dieta sin gluten)
8 rebanadas de queso mozzarella
Aceite de buena calidad para freír

Comience por cocinar la papa en agua con sal hasta que esté blanda. Deje que se enfríe y pelela utilizando un cuchillo pequeño. Pele el güisquil crudo con un pelador de vegetales. Corte la papa y güisquil en rodajas finas. Para formar los rellenos, coloque 1 rebanada de queso mozzarella entre 2 rebanadas de verdura. Repita el proceso hasta que tenga aproximadamente 4 o más rellenos de cada verdura.

A continuación, separe las claras de huevo y batirlas hasta que queden espumosas, aumentando la velocidad de la batidora gradualmente hasta que la mezcla esté suave y a punto de nieve como merengue. No importa qué tipo de batidora use. Mi madre solía hacer esto con solamente un tenedor.

Añada las yemas de huevo y la harina y bata hasta que la mezcla de huevo esté amarilla y cremosa pero no la mezcle demasiado. Caliente más o menos una 1/3 taza de aceite en una sartén. Sumerja cada relleno en el huevo batido y deslicelos con cuidado en el aceite caliente en la sartén, uno a la vez. Puede que tenga que trabajar en tandas.

Fría los rellenos a fuego medio hasta que se doren, alrededor de 1 o 2 minutos por cada lado. Retire con una espumadera y escurra el exceso de aceite sobre papel toalla. Sumerja los rellenos en salsa de tomate (ver receta a continuación) y cocinelos a fuego medio durante 15 minutos o hasta que el queso se derrita y los vegetales estén blandos.

Salsa tradicional Salvadoreña de tomate para rellenos y otros platos:

4 tomates, cocidos en agua
1 taza de caldo de pollo
1 diente de ajo, machacado (opcional)
1/2 cebolla, picada
1/2 chile (cualquier color), picado
1/2 cucharadita de orégano
Sal y pimienta al gusto

Cocine los tomates en agua y hierva durante un par de minutos. Tire el agua, ponga los tomates sin pelar en la licuadora con el caldo de pollo, y reserve. Saltee las cebollas, el pimiento y el ajo con un poquito de aceite. Sazone con el orégano, la sal y la pimienta. Licue todos los ingredientes y vierta la salsa en la sartén. Hierva la salsa y siga cocinando a fuego lento para que se mantenga caliente hasta que esté listo para su uso.

Pollo en Achiote

pollo al achiote

Pollo en achiote is a simple, yet exotic chicken dish. You need a banana leaf to cook it. Banana leaves are not strong tasting. You don’t eat the actual leaves. We use them to wrap tamales for example. The flavor seeps into the food without overpowering it. Many Latino markets sell banana leaves for tamales, but I was too lazy to drive out to the market this afternoon. My neighbors next door have two banana trees so being so shy as I am, I talked my husband into going to ask the neighbors for me to donate some banana leaves for a worthy cause. I was a bit embarrassed I have to admit. They’re from Thailand and they also use banana leaves in some of their dishes, so they were quite generous to share them with me. As a matter of fact, they showed up at our door a few minutes later to bring us other goodies. It was so sweet of them. Kind neighbors are a treasure. Two days later we brought them some homemade pastries to return their kindness.

pollo al achiote

Achiote is the actual main ingredient, besides chicken. Achiote powder comes from ground annatto seeds and it’s not strong tasting at all. It’s used as a food colorant in many dishes. It’s a bit smoky but not like paprika, although paprika is a good substitute if you can’t find achiote.

Ingredients:

6 chicken pieces (thighs, breasts, etc)
Freshly squeezed juice from 2 oranges (please don’t use store-bought orange juice)
1 tablespoon achiote powder
1 garlic clove, mashed
1/2 onion, sliced
Salt and pepper to taste
Good quality oil to brown the chicken
1 banana leaf (optional)

In a large ziploc bag, combine chicken, orange juice, achiote, garlic, onion, salt, and pepper. Seal the bag and shake it to mix all the ingredients. Marinate the chicken for at least 30 minutes.

In a pan, heat some oil and brown the chicken pieces on both sides. Remove the chicken, turn off the heat, and line the same pan with the banana leaf. Arrange the chicken on top of the banana leaf, along with the onions from the marinade. Discard the marinade and cook the chicken, covered on low heat for 20 minutes if it’s boneless chicken or 30 minutes for chicken with bones. That’s it. Serve with vegetables or rice of your choice.

En Español

Pollo en achiote es un plato de pollo sencillo, pero exótico a la vez. Se necesita una hoja de huerta de banano o guineo (asi le decimos a las bananas en El Salvador) para cocinarlo. El sabor de las hojas de banano no es fuerte. No se comen las hojas. Las usamos para envolver tamales, por ejemplo. El sabor se infiltra en los alimentos de una manera delicada. Muchos mercados latinos venden hojas de huerta para tamales, pero yo me dio pereza salir a comprarlas esta tarde. Mis vecinos de al lado tienen dos matas de huerta siendo tan tímida como soy, convencí a mi esposo a que les fuera a pedir a los vecinos que nos donaran dos hojas de plátano para una causa digna. Yo estaba un poco avergonzada, tengo que admitirlo. Los vecinos son de Tailandia y también utilizan hojas de plátano en algunas de sus recetas, por lo que fueron bastante generosos de compartir las hojas conmigo. Como cuestión de hecho, se presentaron en nuestra puerta unos minutos después para traernos otras cosas. Fue muy amable de su parte. Los vecinos amables son un tesoro. Dos días más tarde les lleve unas milhojas hechas en casa para devolver su amabilidad.

El achiote es realmente el ingrediente principal de este plato, además del pollo. El achiote en polvo proviene de las semillas de achiote molido y no es de sabor fuerte. Se utiliza como colorante de alimentos en muchos platos. Es de un sabor un poco ahumado, pero no como la paprika, aunque la paprika es un buen sustituto si no puede encontrar achiote.

Ingredientes:

6 piezas de pollo (entrepiernas, pechugas, etc)
Jugo recién exprimido de 2 naranjas (por favor no usar jugo de naranja comprado en la tienda)
1 cucharada de polvo de achiote
1 diente de ajo, machacado
1/2 cebolla, en rodajas
Sal y pimienta al gusto
Aceite para dorar el pollo
1 hoja de plátano (opcional)

En una bolsa grande ziploc, mezcle el pollo, el jugo de naranja, el achiote, el ajo, la cebolla, la sal y la pimienta. Selle la bolsa y agite para mezclar todos los ingredientes. Marinar el pollo por lo menos durante 30 minutos.

En una sartén, caliente un poco de aceite y dore las piezas de pollo por ambos lados. Retire el pollo, apague el fuego, y ponga la hoja de plátano en el fondo de la sartén. Coloque el pollo encima de la hoja de plátano, junto con la cebolla de la marinada. Deseche el jugo de la marinada y cocine el pollo cubierto a fuego lento durante 20 minutos si es pollo sin hueso o 30 minutos para el pollo con huesos. Sirva con verduras o arroz de su preferencia.


Milhojas

milhojas

Milhojas, a thousands leaves, are desserts made with puff pastry and filled with velvety and pearly white meringue. It’s a piece of heaven in your mouth. As a young kid I used to look forward to going to my grandpa’s house in El Salvador because he had a small store where he sold groceries, snacks, cheese, and pastries, including milhojas. Going there I knew he’d want to spoil his grandkids so I would always ask for a milhoja. On the long bus ride to get there, all I could think of was getting to his house quickly so I could ask for my long awaited opportunity to eat milhojas. As a kid, my favorite part of a cake was always the frosting and a milhoja is about 90 % percent frosting. Wow! What a perfect dessert.

milhojas

Milhojas have their roots in French cuisine, better known in France as millefeuilles. Here in the U.S. they are known as Napoleons and there are many variations of this yummy dessert. Milhojas are popular in Spain and in different parts of Latin America, and can vary in different types of fillings and creams used. Here’s my Salvi version. The pastry cream isn’t traditional in Salvadoran milhojas but I think it’s a nice addition, but you can certainly omit it.

milhojas

You will need:

Kitchen Aid stand mixer and whisk attachment or hand mixer
2 or more baking sheets
Parchment paper
Candy thermometer
About 3 cups of ice cubes or crushed ice
A few mixing bowls
Serrated knife

*Tip: Start by preheating your oven to 350 F and separating egg whites and yolks. Save at room temperature until ready to use.

For the puff pastry:

2 boxes store-bought puff pastry sheets

Powdered sugar (to dust pastries at the end)

Roll out the thawed pastry sheets over a floured board and cut out 12 rectangles. Working in batches, arrange the pastry sheets on a baking sheet lined with parchment paper. Cover them with more parchment paper, and put another baking sheet on top to prevent the dough from puffing up. Bake at 350 F degrees for 15-20 minutes, until lightly browned. Continue the process with the rest of the dough. Let baked puffed pastry sheets cool on a wire rack until ready to use.

For the meringue:

1 cup sugar
1/2 cup water
4 room temperature egg whites
1/2 teaspoon lemon juice (strained)

Combine egg whites and  lemon juice in the bowl of your stand mixer. Start mixer on low speed to break up the protein in the egg whites. Gradually increase the speed to medium and mix until soft peaks form.  Meanwhile, in a small saucepan, combine sugar and water. Heat over high heat. The sugar will melt and turn into a boiling syrup. Cook until sugar syrup registers 240°F on a candy thermometer. With the mixer running, carefully and slowly drizzle in hot sugar syrup using a spoon or funnel. Increase speed to high and whip until the meringue is stiff like frosting. Decrease the speed to medium until the meringue cools. You may continue to mix on low speed until ready to use. This will prevent the meringue from losing its volume and stiffness. The process of making meringue requires some multi-tasking so make sure you don’t have any interruptions or ask someone to assist you.

For the pastry cream:

1/4 cup cornstarch
3/4 cup sugar (divided)
2 cups whole milk (divided)
4 large egg yolks, lightly beaten
1 pinch salt
2 teaspoon vanilla extract or one vanilla bean, scraped
2 tablespoons room temperature unsalted butter (if using salted butter simply omit pinch of salt listed above)

*Tip: Prepare an ice bath in  a large bowl or simply fill a bowl with ice cubes.

Combine the cornstarch with 1/4 cup of the sugar and 1/2 cup of the milk in a bowl. Add this mixture to the the yolks mixing with a hand whisk or spoon until completely smooth. Combine the remaining 1 1/2 cups of milk with the remaining 1/2 cup sugar in a saucepan. Add the vanilla bean or vanilla extract and pinch of salt. Cook over medium heat and bring the milk to a boil. Remove pan from the heat as soon as it starts to boil.

Temper the egg mixture by slowly adding the hot milk mixture with a ladle, whisking constantly. This will prevent the eggs from getting shocked with heat all at once and becoming scrambled eggs. Add the rest of the milk mixture slowly and continue whisking. Return mixture to the saucepan and continue cooking over medium heat.  Mix the cream with a whisk, until the cream thickens up and you feel like it’s a real arm workout, about 4-5 minutes. Remove the saucepan from the heat and stir in the butter, until fully combined and melted. Place the saucepan on the ice. Whisk occasionally until the pastry cream is cool and ready to use. This cream can made up to 3 days in advance and kept refrigerated in a container until ready to use.

To assemble milhojas:

Each pastry will have three layers of puff pastry with one layer of pastry cream and one layer of meringue in between. Spread pastry cream on a cooled puff pastry sheet to create the first layer. Next, place a second puff pastry sheet on top and spread with meringue. Place a third sheet of puff pastry over meringue. Repeat the process with all the puff pastry sheets you have left. Finally, dust with powdered sugar. Refrigerate for at least 1 hour before cutting the milhojas into smaller rectangles with a serrated knife. This can be a little messy because the frosting will tend to slide out. But don’t worry. They’ll still look fancy even if they’re not cut perfectly like in the pastry shops. Your guests won’t mind. These milhojas won’t last very long.

*Tip: It helps to rinse the knife often in hot water. Make sure to dry it with a towel though. A wet knife will melt the meringue. When you’re cutting the milhojas, it also helps to hold the pastry down firmly, without breaking it, to keep the meringue from sliding out.

milhojas

En Español

Las milhojas son un tipo de repostería hechas con hojaldre y llenas de un turrón de merengue blanco y aterciopelado. Es un pedacito de cielo en tu boca. Cuando era niña íbamos a la casa de mi abuelo en El Salvador y él tenía una pequeña tienda donde vendía comestibles, dulces, queso y repostería, incluyendo las milhojas. Yo sabía que le iba a dar a sus nietos lo que quisieran, así que siempre le pedía una milhoja. En el largo viaje en autobús para llegar allí, lo único que podía pensar era en llegar a su casa pronto para mi tan esperada oportunidad de comer milhojas. Cuando era niña, mi parte favorita de un pastel siempre fue el glaseado o turrón, y una milhoja salvadoreña tiene un relleno que es aproximadamente 90% de turrón. El postre perfecto. Las milhojas tienen sus raíces en la cocina francesa, más conocidas en Francia como millefeuilles. Aquí en los EE.UU. se les conoce como Napoleones y hay muchas variaciones de este delicioso postre. Las milhojas son populares en España y en diferentes partes de América Latina, y pueden variar en los diferentes tipos de rellenos y cremas utilizadas. Pues aquí está mi versión. La crema pastelera no es tradicional en milhojas salvadoreñas, pero creo que es una buena adición, pero puede ser omitida.

milhojas

Necesitará:

Una batidora Kitchen Aid equipada con un accesorio batidor o batidora manual
2 o más bandejas para hornear
papel para hornear (no encerado)
termómetro de caramelo
Alrededor de 3 tazas de hielo
Unos tazones
Cuchillo de sierra

* Sugerencia: Comience precalentando el horno a 350F y separe las claras de huevo y las yemas. Guarde a temperatura ambiente hasta que esté listo para su uso.

Para el hojaldre:

2 cajas de láminas de hojaldre (de las venden congeladas en la tienda)
Azúcar en polvo

Estire las láminas de hojaldre descongeladas sobre una tabla enharinada y corte 12 rectángulos. Trabajando en tandas, ponga las láminas de hojaldre en una bandeja para hornear forrada con papel de hornear. Cubrirlas con más papel para hornear, y ponga otra bandeja de hornear encima para que no crezca la masa. Hornee a 350 F grados durante 15-20 minutos, hasta que estén ligeramente doradas. Continúe el proceso con el resto de las láminas de hojaldre. Deje que las láminas de hojaldre se enfríen sobre una rejilla hasta que esté listo para su uso.

Para el merengue:

1 taza de azúcar
1/2 taza de agua
4 claras de huevo (temperatura ambiente)
1/2 cucharadita de jugo de limón (colado)

Combine las claras de huevo y jugo de limón en el tazón de su batidora. Comience la batidora a velocidad baja para romper la proteína en las claras de huevo. Poco a poco aumente a velocidad mediana y bata hasta que se formen picos suaves. Mientras tanto, en una olla pequeña, combine el azúcar y el agua. Caliente a fuego alto. El azúcar se derrite y se convierte en un jarabe hirviendo. Cocine hasta que el jarabe de azúcar registre 240 ° F en un termómetro de caramelo. Con la batidora en marcha, con cuidado y lentamente agregue el azúcar caliente con una cuchara o embudo. Aumente la velocidad de la KitchenAid al número 8 y bata hasta que el merengue esté como turrón. Siga batiendo a velocidad mediana hasta que el merengue se enfríe. Puede continuar batiendo en velocidad baja hasta que esté listo para su uso.  Esto ayudará a que el merengue no pierda su forma y volumen. El proceso de hacer merengue requiere un poco de multitarea así que asegúrese de que no tenga ningún tipo de interrupciones o pídale a alguien que le ayude.

Para la crema pastelera:

1/4 taza de maicena
3/4 taza de azúcar (dividida)
2 tazas de leche (dividida)
4 yemas de huevos, ligeramente batidas
1 pizca de sal
2 cucharaditas de extracto de vainilla o una vaina de vainilla, raspada
2 cucharadas de mantequilla sin sal a temperatura ambiente (si utiliza mantequilla salada simplemente omita la pizca de sal antes mencionada)

* Consejo: Prepare un baño de hielo en un tazón grande o simplemente llene un recipiente con cubitos de hielo.

Combine la maicena con 1/4 taza de azúcar y 1/2 taza de la leche en un tazón. Vierta las yemas en la mezcla de la maicena, mezcle con un batidor de mano o una cuchara hasta que todo esté completamente incorporado. Combine el resto de la leche con la 1/2 taza de azúcar restante en una olla. Agregue la vainilla o el extracto de vainilla y una pizca de sal. Cocine a fuego medio. Retire la olla del fuego tan pronto como empiece a hervir.

Para templar la mezcla de huevo, añada la leche caliente poco a poco con un cucharón, batiendo constantemente la mezcla. Esto evitará que los huevos se cocinen de repente y se conviertan en huevos revueltos. Añada el resto de la  leche lentamente y continúe batiendo.  Vierta la mezcla de regreso en la olla y siga cocinando a fuego mediano. Mueva la crema rápidamente con un batidor de mano hasta que la crema espese y usted se sienta como si fuera un entrenamiento muscular, unos 4-5 minutos. Retire la olla del fuego y agregue la mantequilla y mezcle hasta que se derrita. Coloque la olla en el hielo. Mueva la crema de vez en cuando hasta que la crema pastelera esté fría y lista para usar. Esta crema se puede hacer hasta 3 días con anticipación y se mantiene refrigerada en un recipiente hasta que esté listo para su uso.

Para ensamblar milhojas:

Cada milhoja tiene tres capas de hojaldre con una capa de crema pastelera y una capa de merengue en el medio. Cubra una lámina de hojaldre horneada con crema pastelera para crear la primera capa. A continuación, coloque una segunda lámina de hojaldre sobre la crema pastelera y cubrala con turrón. Coloque una tercera lámina de hojaldre sobre el merengue. Repita el proceso con el resto de la láminas de hojaldre. Por último, espolvoree con azúcar en polvo. Refrigere por lo menos 1 hora antes de cortar las milhojas en rectángulos más pequeños con un cuchillo de sierra. Esto puede ser un poco complicado debido a que el turrón tenderá a salirse. Pero no se preocupe. Todavía van a verse muy gourmet aunque no se corten a la perfección como en las pastelerías. No les importará a sus invitados. Estas milhojas no va a durar mucho tiempo.

* Consejo: Ayuda mucho lavar el cuchillo a menudo en agua caliente, pero asegúrese de secarlo con una toalla. El cuchillo mojado derretirá el merengue. Ayuda también sujetar la milhoja con firmeza, sin romperla, para que el turrón no se salga cuando las esté cortando.

milhojas


Pollo en Alguashte or Chicken in Pumpkin Seed Sauce

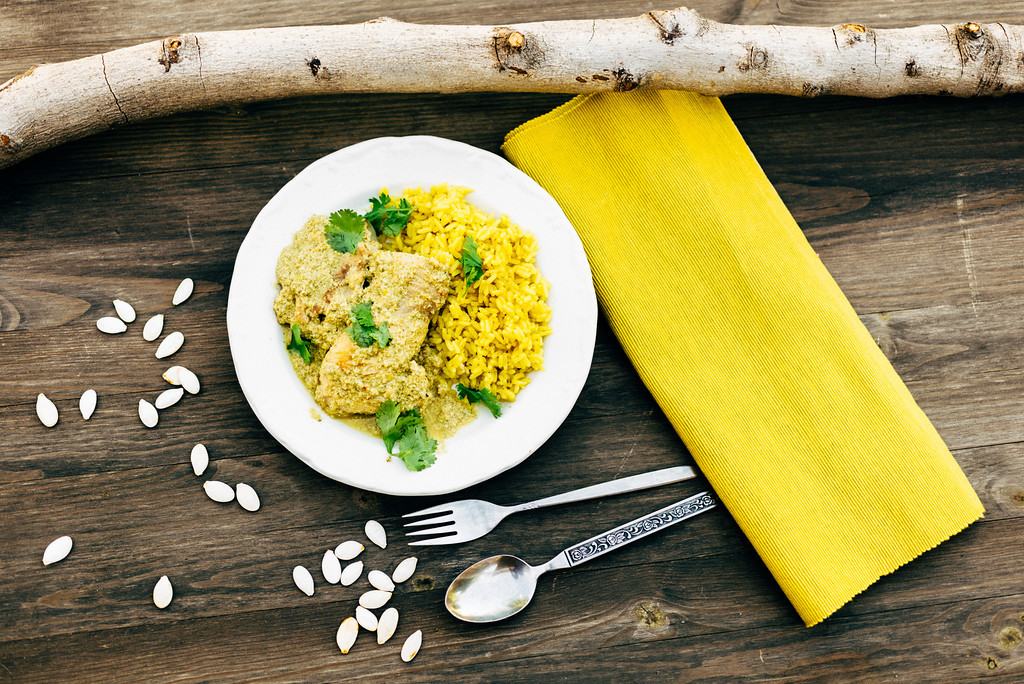
by Eugenia Munguía-George


Ingredients:

4-6 pieces of chicken (thighs, legs, etc)
1/4 cup flour
3 tablespoons oil (or enough to coat the pan)
1/2 onion, roughly chopped
1/2 bell pepper, roughly chopped
1 cup white wine
1 bay leaf
1/4 teaspoon saffron (optional)
2 egg yolks from hard boiled eggs
1 garlic clove
3 sprigs cilantro
1 cup alguashte (pumpkin seed powder)
1 1/2 cups chicken stock
Salt and pepper

Season the chicken with salt and pepper and lightly dredge in flour. Heat oil in a pan on medium heat and brown the chicken until it’s nice and golden. Set it aside on a plate. In the same pan drizzle a little more oil and saute the onion and bell pepper. Transfer the onion and bell pepper to the blender. Place the chicken back in the pan, add the wine, and bring to a quick boil, making sure to scrape all the flavorful bits from the bottom of the pan. Next, add the bay leaf, cover, and simmer on low heat for 20 minutes if it’s boneless chicken or 30 minutes with bones.

To make the sauce, blend the cooked onion, bell pepper, saffron (if using), egg yolks, garlic, cilantro, chicken stock, alguashte (pumpkin seed powder), and 1/2 teaspoon of salt. Add this sauce to the chicken during the last 10 minutes of cooking. Taste and sprinkle a little more salt if necessary. Add more chicken stock or water to the sauce if it thickens up too much. Serve with a side of rice or salad.

En Español

Pollo en Alguashte

Ingredientes:

4-6 piezas de pollo (muslos, piernas, etc)
1/4 taza de harina
3 cucharadas de aceite (o lo suficiente para cubrir la sartén)
1/2 cebolla, cortada en pedazos
1/2 chile verde, picado en trozos
1 taza de vino blanco
1 hoja de laurel
1/4 cucharadita de azafrán (opcional)
2 yemas de huevo de huevos duros
1 diente de ajo
3 ramitas de cilantro
1 taza alguashte (polvo de semilla de calabaza o ayote)
1 1/2 tazas de caldo de pollo
Sal y pimienta

Sazone el pollo con sal y pimienta y ligeramente páselo por harina. Caliente el aceite en una sartén a fuego medio y fría el pollo hasta que quede bien doradito. Póngalo a un lado en un plato. En la misma sartén eche un chorrito de aceite y sofría la cebolla y el chile verde. Transfiera la cebolla y el pimiento a la licuadora. Coloque el pollo de nuevo en la sartén, añada el vino y hervir rápidamente, asegurándose de raspar todos los pedacitos sabrosos que estén pegados en el fondo de la cacerola. A continuación, añada la hoja de laurel, cubra y cocine a fuego lento durante 20 minutos si es pollo sin hueso o 30 minutos con los huesos.

Para hacer la salsa, licúe la cebolla, el chile, el azafrán (si va a utilizarlo), yemas de huevo, el ajo, el cilantro, el caldo de pollo, alguashte (polvo de semilla de calabaza), y 1/2 cucharadita de sal. Añada esta salsa al pollo durante los últimos 10 minutos de cocción. Pruebe y sazone con un poco más de sal si es necesario. Agregue más caldo de pollo o agua a la salsa si se espesa demasiado. Sirva con un acompañamiento de arroz o ensalada.

Pumpkin Seed Powder

Pumpkins and squash were the earliest known main staple foods of the Mesoamerican region, even before corn and beans were domesticated. From Mesoamerica, the pumpkin species spread all over North and South America. The natives peoples of these regions were resourceful and creative, using every part of the vegetable. Today, pumpkin and squash appear in various forms in the cuisines of Mexico and Central America. Pumpkin seeds, rich in zinc and other minerals, are roasted then ground into a powder better known as alguashte in El Salvador. This pumpkin seed powder is used as the base for sauces in many dishes of Mayan origin. It’s also sprinkled on fruit like unripe mango, a traditional street snack.

pumpkin seed powder

To prepare:

Toast 1 cup of unshelled pumpkin seeds on a skillet over low heat for about 5 minutes or until slightly brown. Grind the seeds to a fine powder using a coffee grinder or food processor. Sift the powder using a fine mesh metal strainer to get rid of large pieces. Store in an airtight container for up to 1 month in your pantry or 3 months in the fridge.

pumpkin seed powder

En Español

Las calabazas fueron los primeros alimentos básicos principales conocidos en la región mesoamericana, incluso antes de que se domesticaron el maíz y el frijol. De Mesoamérica, las diferentes especies de calabaza se repartieron por todo Norte y Sur América. Los originarios de estas regiones eran ingeniosos y creativos, utilizando todas las partes del vegetal. Hoy en día, la calabaza aparece en varias formas en las cocinas de México y América Central. Las semillas de calabaza o ayote, ricas en zinc y otros minerales, se tuestan luego se muelen en un polvo más conocido como alguashte en El Salvador. Este polvo de pepitorias se utiliza como la base para las salsas de muchos platos de origen maya. También es espolvoreado sobre las frutas como el mango verde, una merienda tradicional de la calle.

pumpkin seed powder

Para preparar:

Tueste 1 taza de semillas de calabaza sin cáscara en una cacerola a fuego lento durante unos 5 minutos o hasta que estén ligeramente doradas. Muela las semillas a un polvo fino usando un molinillo de café o procesador de alimentos. Cierna el polvo utilizando un colador de metal fino para deshacerse de pedacitos grandes. Mantenga en un envase hermético por hasta 1 mes en su despensa o 3 meses en la refrigeradora.

My Daughter’s Strawberry Shortcake

My daughter Bella’s idea of fun is cooking with mom in the kitchen, even when she’s sick on her birthday. We had spent the entire morning at the aquarium and then we came home for a nap. The poor thing was really under the weather by the time we got home. Later after dinner, she went in her FunPod and we started to assemble her birthday cake. She’s a trooper! We had celebrated her birthday with her cousins over the weekend, but at three years old, she really got into the whole birthday idea. Her eyes beamed with joy and amazement as she opened every present. The Happy Birthday song wasn’t so strange anymore. She couldn’t get enough of it and blowing candles… Now THAT was the highlight of the whole cake experience. We lit the candles a few times so she could blow them again, and again… Those are perks of an only child on her birthday week. I was a bit sentimental I have to admit. Time flies and I can’t believe my kid is three. You can’t hold back time but you can hold on to memories. That’s what really matters.

 For this strawberry shortcake version we used 6 simple ingredients:

  • 1 store-bought angel food cake loaf
  • 1 lb. strawberries, sliced
  • 1 tablespoon powdered sugar
  • 1/2 pint heavy whipping cream
  • 1 teaspoon vanilla extract
  • 1 tablespoon powdered sugar

30 minutes prior to assembling the cake, macerate the strawberries by sprinkling sugar over them in a bowl. Stir and set aside in the refrigerator until ready to use. Macerating is the process of adding sugar to fruit to release its juices and create a little syrup which is nice for cakes, pies, and many desserts.

Using a serrated knife, slice the cake lengthwise into three layers. Set aside until ready to use.

Make the whipped cream:  In a large bowl and using whisk attachment, whip the cream, increasing the speed to medium gradually until soft peaks form. Pour in the vanilla and sugar until soft peaks form again. Avoid over-beating so the cream doesn’t become lumpy and butter-like.

Next, spread 1/3 of the whipped cream over the bottom layer of the cake. Top with strawberries and repeat the process until you finish covering the top layer with whipped cream and strawberries.

En Español

Estar en la cocina con mamá es lo a que a mi hija Bella le parece muy divertido, incluso cuando ella está enferma en su cumpleaños. Habíamos pasado toda la mañana en el acuario y luego nos volvimos a casa a dormir la siesta. La pobre estaba un poco enfermita en el momento en que llegamos a casa. Más tarde después de la cena, se fue en su FunPod y comenzamos a hacer el pastel de cumpleaños. Habíamos ya celebrado su cumpleaños con sus primos en el fin de semana, pero a los tres años de edad, ella realmente disfrutó su cumpleaños. Sus ojos brillaban de alegría y asombro mientras abría todos los regalos. La canción del feliz cumpleaños no le pareció tan extraña. La repetimos varias veces. Ese era el punto culminante de toda la experiencia del pastel. Encendimos las velas varias veces para que pudiera soplar de nuevo, y otra vez más … esas son las ventajas de ser nuestra única niña en su semana de cumpleaños. Tengo que admitir que me sentí un poco sentimental. El tiempo vuela y no puedo creer que mi hija tiene tres años. No se puede detener el tiempo, pero se pueden guardar los recuerdos. Eso es lo que realmente importa.

Para esta versión de pastel de fresas utilizamos 6 ingredientes sencillos:

1 pan de angel, comprado en la tienda
1 libra de fresas cortadas en rodajas
1 cucharada de azúcar glacé
1/2 litro de crema de leche
1 cucharadita de extracto de vainilla
1 cucharada de azúcar en polvo

30 minutos antes de ensamblar el pastel, maceramos las fresas  en un tazón espolvoreando azúcar por encima. Revuelva las fresas con azúcar y deje en el refrigerador hasta que esté lista para usarlas. La maceración es el proceso de añadir azúcar a la fruta para soltar sus jugos y crear un poco de jarabe el cual es delicioso en pasteles, tartas y muchos postres.

Usando un cuchillo de sierra, corte el pastel a lo largo en tres capas. Pongalas a un lado hasta que esté lista para su uso.

Hacer la crema batida: En un tazón grande y usando la batidora, bata la crema, aumentando a velocidad mediana poco a poco, hasta que la crema quede a punto de picos suaves. Agregue la vainilla y el azúcar,  y siga batiendo incrementado la velocidad hasta que se formen picos suaves otra vez. Evite batir demasiado para que la crema no se convierta en grumos y se haga como mantequilla.

A continuación, untamos un tercio de la crema batida sobre la primera capa del pastel. Luego, ponga una capa de fresas encima de la crema, y repita el proceso hasta que termine de cubrir la capa superior del pastel con crema batida y fresas.

Salvadorian Meat Patties In Tomato Sauce

Meat Ingredients:

1 lb. ground beef or turkey
1 egg
1/2 cup breadcrumbs
1 teaspoon no salt seasoning of your choice
Salt and pepper to taste
Oil, enough to coat the pan

Sauce:

1/2 onion, roughly chopped
1/2 red bell pepper, roughly chopped
1/2 cup white wine
1 can diced tomatoes
2 cups chicken stock
¼ teaspoon sugar
1 teaspoon oregano
Salt and pepper to taste
Oil, enough to coat the pan

Combine the meat ingredients with your clean hands (the best cooking tools). Make small patties, roughly the size of your palm and brown them in a pan coated with a little bit of oil. Once the patties are nice and brown on both sides, remove them from the pan. Coat the pan with a little more oil if necessary and add the onion and bell pepper and saute until the onions are translucent. Next, pour the wine and deglaze the pan. Blend together the onion, bell pepper, pan juices, and diced tomatoes. Place all the meat patties back in the pan and pour the tomato sauce over the patties. Sprinkle in some sugar to counterbalance the tartness of the tomatoes. Season the sauce with oregano, salt, and pepper. Cook for 15 minutes on medium heat until the meat patties are completely cooked through. Serve with a side of white rice if desired.


En Español

Tortitas de Carne

Para la carne:

1 libra de carne molida de res o pavo
1 huevo
Media taza de pan rallado
1 cucharadita de sazonador sin sal de su gusto
Sal y pimienta al gusto
Aceite, suficiente para cubrir la sartén

Para preparar la salsa:

1/2 cebolla, cortada en pedazos
1/2 chile rojo, picado en trozos
1/2 taza de vino blanco
1 lata de tomates picados
2 tazas de caldo de pollo
¼ cucharadita de azúcar
1 cucharadita de orégano
Sal y pimienta al gusto
Aceite, suficiente para cubrir la sartén

Combine los ingredientes de carne con las manos limpias (las mejores herramientas de cocina). Haga tortitas pequeñas, aproximadamente del tamaño de la palma de su mano y ponerlas a freír en una sartén recubierta con un poco de aceite hasta que queden bien doraditas. Retire las tortitas de la sartén ya que esten doradas por ambos lados. Eche un poco más de aceite en la sartén si es necesario y añada la cebolla y el chile y sofría hasta que la cebolla esté transparente. A continuación, vierta el vino y deglaze la sartén para remover todos los pedacitos de carne que hayan quedado pegados en la sartén. Mezcle la cebolla, el pimiento, jugos de la sartén, y los tomates picados. Coloque todas las tortitas de carne de nuevo en la sartén y vierta la salsa de tomate sobre las tortitas.Échele un poquito de azúcar a la salsa para contrarrestar la acidez de los tomates. Sazone con el orégano, la sal y la pimienta. Cocine durante 15 minutos a fuego medio hasta que las tortitas de carne estén completamente cocidas. Acompañe con arroz blanco si desea.

Atol de Elote

corn

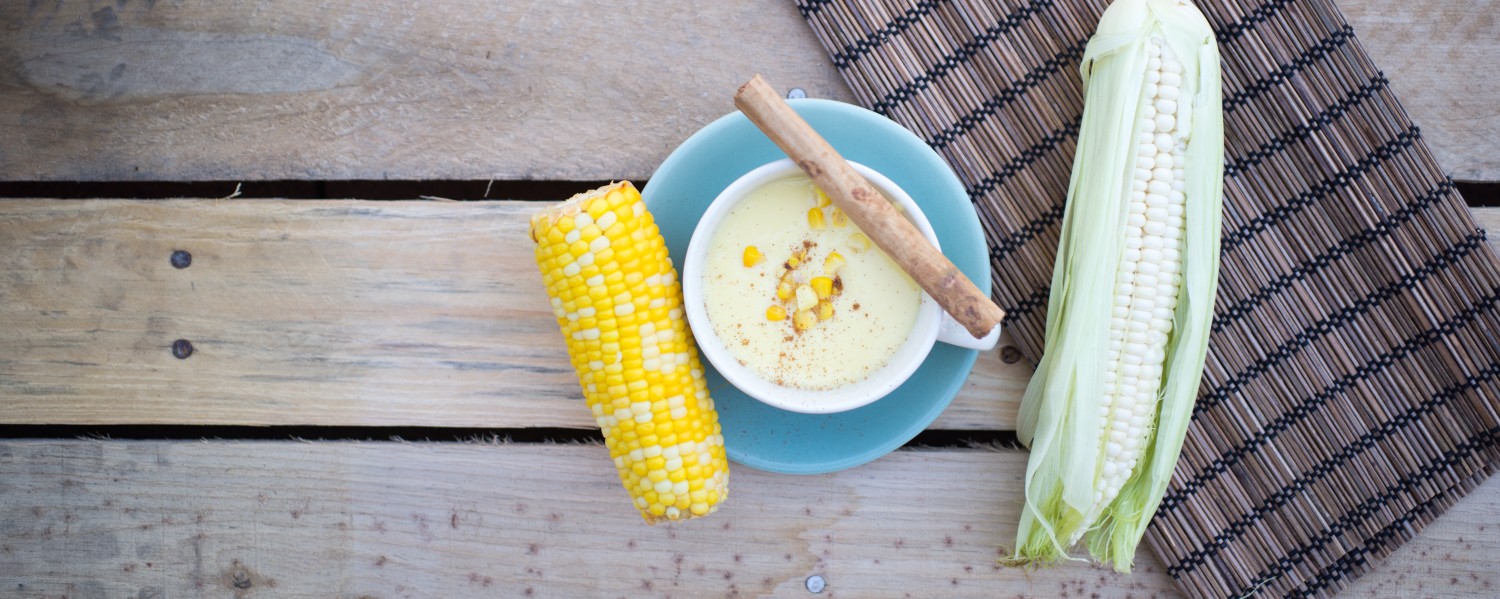
Corn is such a vital crop. From cornflakes to fuel, corn has many uses and it is definitely a staple crop in America and the world. We can thank the early pre-Columbian civilizations of Mesoamerica for domesticating this humble, yet versatile grain. This is the reason why corn is the main ingredient in the cuisine of these regions. Thanks to cultural diffusion and the success of this crop, corn became the main source of food that provided sustenance to the Mayan and Aztec civilizations. So, no wonder corn is deeply ingrained in the typical diet of every Salvadorian, as well as our Mesoamerican neighbors.

atol de elote

Here, ladies and gentlemen, is my recipe for atol de elote. Atoles are thick, corn-based drinks popular all over Mexico and Central America. We’re talking about comfort food at its best. Some atoles like this one are made with fresh corn, while others are made with cornstarch and flavored with spices, fruit, and even chocolate, but regardless of the flavors, corn is the main element that gives atoles their creamy, almost gravy-like consistency.

White or yellow corn? If you’re Salvadorian and a purist, then I’m sure we can have a true debate about this one. Some Salvis claim that white corn is the only corn you can use in this recipe. I personally prefer yellow corn because it’s sweeter. This is sort of a snack/dessert type of treat. It’s what you get at the bus stop on your way home from a long day at work or school (if you live in El Salvador). Nothing says “comfort” more than a warm cup of atol de elote with a spicy undertone of cinnamon.


Atol de Elote
4 servings

5 ears ripe yellow corn or 2 ½ cups frozen corn (thawed) or canned corn

2 cups 2% milk
¼ cup sugar
1 cinnamon stick
1 pinch salt
Powdered cinnamon for garnishing
Freshly cooked corn on the cob to serve on the side (optional)

Slice the kernels from the corn and blend with 2 cups of milk until smooth. Strain the mixture over a pot. Add the cinnamon stick and sugar. Cook on medium heat, stirring constantly for 10 minutes, or until the atol thickens up. Sprinkle in a pinch of salt at the last minute and remove from the heat. Water can be added to thin out the atol if it needed. Serve in bowls or mugs and garnish with cooked corn kernels and ground cinnamon. It’s traditionally served with boiled or grilled corn on the cob.

The process is similar to making custard or pastry cream. The trick is not to allow the atol to come to a full boil. Instead, cook it slow and easy, stirring it the entire time. Boiling the atol too quickly may cause the milk to burn or curdle.  Some Salvadorian ladies say that it’s all about the pinch of salt at the end. They say it keeps the milk from curdling. I’m not sure about that; maybe it’s an old wives tale. I think the salt brings out the sweetness of the corn nicely, but what prevents curdling is blending the milk and corn together as well as not using fat-free milk. The higher the fat content, the less likely it is to curdle. Do not use water at the beginning of the process.

En Español

El maíz es un cultivo vital. De cereales a combustible, el maíz tiene muchos usos y es definitivamente un cultivo básico en América y en el mundo. Podemos agradecerles a las primeras civilizaciones precolombinas de Mesoamérica por la dedicada domesticación de este grano humilde, pero versátil . Esta es la razón por la que el maíz es el ingrediente principal en la cocina de estas regiones. Gracias a la difusión cultural y el éxito de este cultivo, el maíz se convirtió en la principal fuente de alimentación que proporcionó sustento a las civilizaciones Maya y Azteca. Por lo tanto, no es de extrañar que el maíz está profundamente arraigado en la dieta típica de cada salvadoreño, así como la de nuestros vecinos mesoamericanos.

atol de elote

Aquí, damas y caballeros, les presento una receta para el atol de elote. Atoles son bebidas espesas a base de maíz, populares en todo México y América Central. Estamos hablando de comida típica de antaño. Los atoles nos transportan a momentos amenos compartidos con abuelita alrededor de la mesa. Algunos atoles como éste se hacen con maíz fresco, mientras que otros son hechos con fécula de maíz y con sabor a especias, frutas, e incluso chocolate, pero sin tener en cuenta los sabores, el maíz es el principal elemento que da a los atoles su cremosa y espesa consistencia.

¿Maíz blanco o amarillo? Si eres de El Salvador y un purista, entonces estoy segura de que podemos tener un tremendo debate acerca de esto. Algunos Salvadoreños afirman que el maíz blanco es el único maíz que se puede utilizar en esta receta. Yo personalmente prefiero el maíz amarillo porque es más dulce. Este es un tipo de merienda o postre. Es lo que se obtiene en la parada de buses en camino a casa después de un largo día de trabajo o en la escuela (si usted vive en El Salvador). Nada te reconforta más que una taza calientita de atol de elote con canela.


Atol de Elote
Rinde 4 porciones

5 elotes amarillos maduros o 2 ½ tazas de maíz descongelado o maíz en lata
2 tazas de leche al 2%
¼ de taza de azúcar
1 raja de canela
1 pizca de sal
Canela en polvo para espolvorear el atol
Elotes enteros sancochados o asados para acompañar (opcional)

Desgrane los elotes con un cuchillo y licue bien con 2 tazas de leche. Cuele la mezcla sobre una olla. Añada la canela y el azúcar. Cocine a fuego mediano, revolviendo constantemente durante 10 minutos, o hasta que el atol se espese. Agregue una pizca de sal en el último minuto y retire del fuego. Se puede añadir agua para diluir el atol si se espesa demasiado. Sirva en cuencos o tazas y decore con granos de maíz cocidos y canela en polvo. Se sirve tradicionalmente con elotes sancochados o asados.

El proceso es similar a hacer flan o crema pastelera. El truco es no permitir que el atol llegue a un hervor completo. En vez, cocínelo lentamente y suave, revolviendo constantemente. Hervir el atol demasiado rápido puede causar que la leche se corte o cuaje. Algunas salvadoreñas dicen que el truco es echarle una pizca de sal al final. Dicen que eso previene que la leche se corte. No estoy segura si es así; tal vez es solo un cuento. Creo que la sal complementa el dulzor del maíz muy bien, pero lo que impide cuajar es licuar la leche y el elote juntos, así como no utilizar la leche sin grasa. Cuanto mayor sea el contenido de grasa, menos probable será que la leche se corte. Tampoco use agua para licuar el elote.