Featured

Salvadorian Holiday Turkey

Holiday Turkey
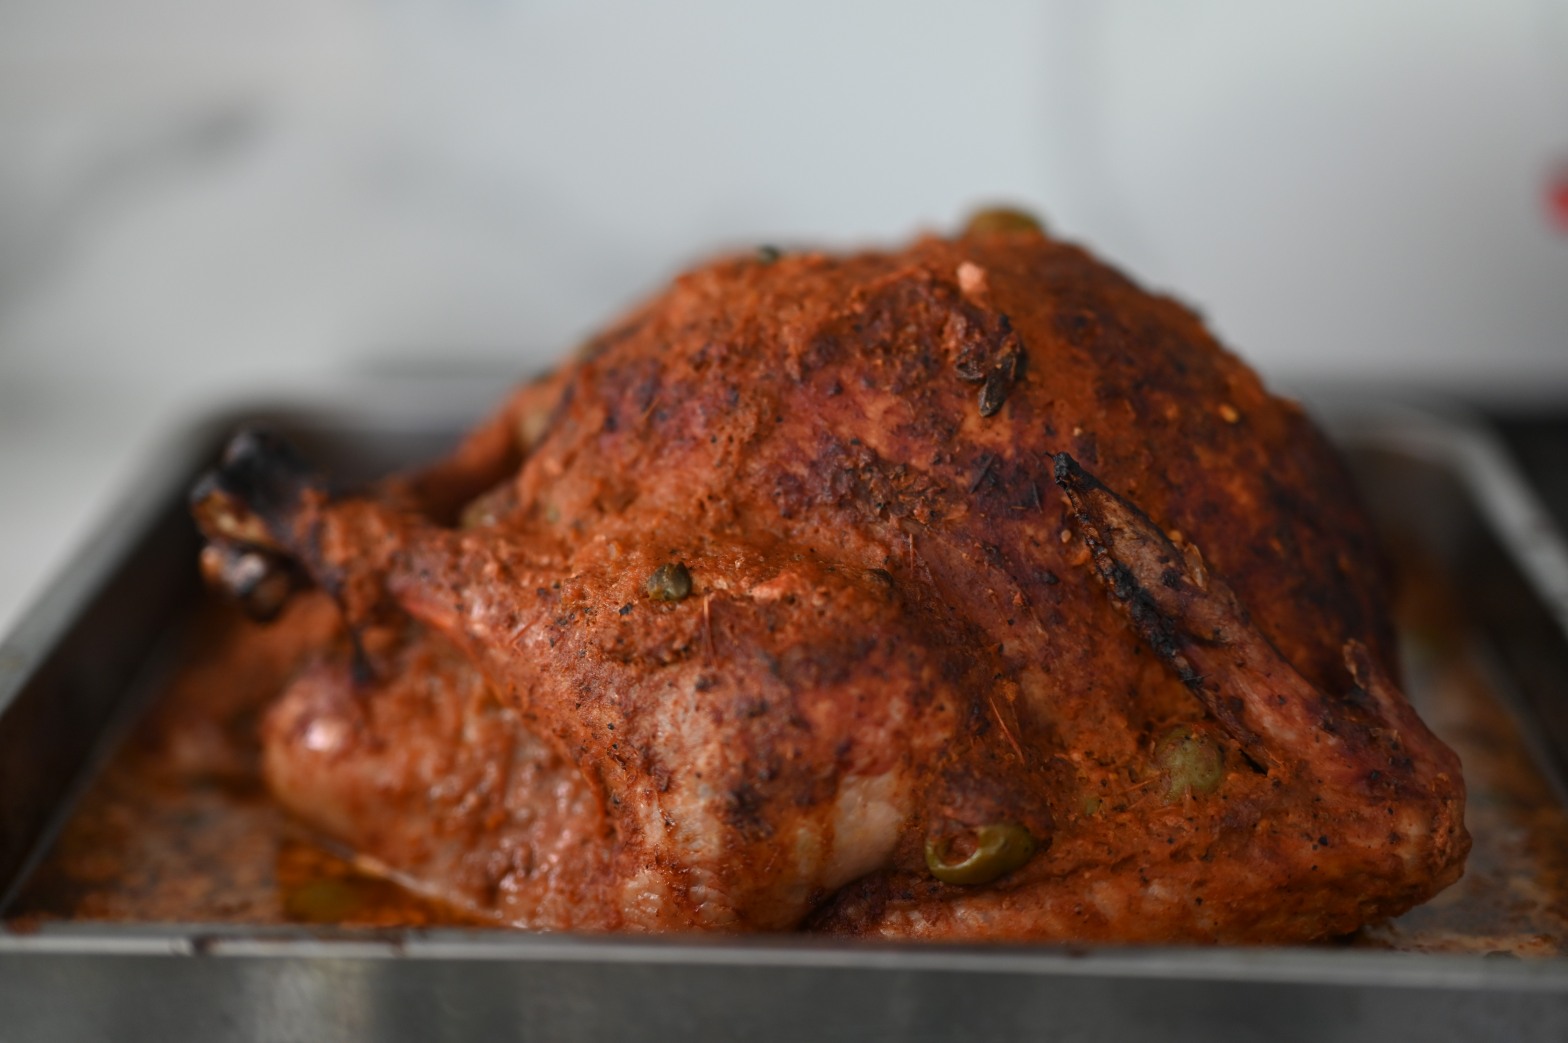
This turkey deserves to be on the hall of fame of holiday turkey recipes. It fills my childhood memories with the laughter and joy of the holidays. We make it either for Thanksgiving or Christmas, and we eat it with rice and salad or in sandwiches more traditionally known as panes con chumpe.  The same sauce can be used with chicken to make panes con pollo. Find some really good French style bread. Spread some mayo, add lettuce, tomatoes, watercress, and a succulent piece of turkey or chicken, dripping with this delicious sauce. 

You will need:

  • 1 turkey, about 16 lbs., thawed, cleaned, and legs tied trussed together. *Baking time will vary depending on the weight of your turkey. 
  • 1 onion
  • 1 bunch of fresh thyme & oregano

*Advice: Trussing the legs is optional. If do, make sure to use a thermometer to check for doneness. Not trussing allows the sauce to fill the cavity of the turkey making both the sauce and turkey more flavorful. What I do is remove the trussing the last hour of baking to allow the juices to flow in the cavity much better. Add the giblets and neck to the sauce. The neck can be cooked alongside the turkey. It adds flavor to the sauce. 

Marinade & Rub:

  • ½ cup butter, softened
  • 2 garlic cloves, mashed 
  • 2 tablespoons mustard
  • 1 teaspoon salt
  • 1 teaspoon ground pepper
  • 1 cup white wine (reserve, see instructions below) 

Sauce:

  • 15 Roma tomatoes
  • 1 onion, peeled and cut in quarters
  • 3 green bell peppers, seeded and quartered (or chopped in large pieces)
  • 1 red bell pepper, seeded and quartered
  • 2 garlic cloves, crushed and peeled
  • 2 cups chicken broth
  • 1 carrot
  • 1 celery stick
  • 1 5.5 oz. jar pimento stuffed Spanish olives, drained
  • 1 2.5 oz. jar capers, drained

Spice mix for the sauce (a.k.a. Relajo):

  • 2 tablespoons pumpkin seeds
  • 2 tablespoons sesame seeds
  • 1/2 teaspoon whole cloves
  • 3 bay leaves
  • 1 tablespoon oregano
  • 1 dried guajillo chile, seeded
  • 1 dried pasilla or ancho chile, seeded
  • 1 tablespoon whole allspice
  • 2 tablespoons peanuts, unsalted
  • 1 teaspoon dried thyme
  • 1 teaspoon ground cumin
  • 1 teaspoon ground achiote or paprika

52522138673_201e8fa653_o

To marinate the turkey:

Mix marinade & rub ingredients, except the wine, into a paste. Rub the turkey with this paste. Place the turkey in a large baking dish and pour the wine all over the turkey. Cover tightly and allow it to marinate in the fridge overnight.

To make the sauce:

Brush a skillet or grill with a little oil and grill the tomatoes whole, along with the onions and bell peppers. Set aside.

Cook the carrot and celery in some chicken stock. Reserve this cooking liquid to thin out the sauce. 

Next,  toast all the spices until they’re slightly brown and the aroma fills your entire kitchen. Toasting the spices helps to intensify and release all the flavors.

Blend the tomatoes, onion, 2 garlic cloves, bell peppers and toasted spices. *You may have to work in batches. Add chicken stock to thin out the sauce. Season with salt and pepper to taste. You can also add a pinch of sugar to cut the tartness of the tomatoes. Cook on low-medium heat for 30 minutes, stirring occasionally. Add whole jars of olives and capers, including a bit of the brine. Keep warm as you will be basting your turkey with this sauce. 

52521870209_04369fdeeb_o52521127237_14ae64b4c5_o

To roast the turkey:

Preheat the oven to 325-350°F on convection mode. Place the turkey breast side up along with the marinade liquid in the roasting pan. Stuff the onion and fresh herbs into the cavity. 

After the first hour of baking, begin basting the turkey every 30 minutes with its own juices from the bottom of the pan as well as some tomato sauce, one ladleful at a time.  Bake for 3-4 more hours. 

Advice: Switch to regular bake mode during the last hour if you would like to speed up the cooking time. Convection mode is usually for slower roasting, but the end result will be a more tender and juice bird, with a crispy skin. 

*Testing doneness with a thermometer is highly recommended.

Because this is a very tender and saucy turkey, it must be left in the roasting pan when carving & serving. 

52521871759_d12ecf4a3f_o

52521405751_3f01f2cb37_o52521404531_bb8f2c2350_o52521951198_cd407d04f5_o

En Español

Nadie más cocina el pavo como nosotros. No hay necesidad de bañar la pechuga reseca con salsa de gravy, a menos que te guste el gravy. No más pavo seco. Este pavo sale jugoso y suculento, y la carne se cae de los huesos. Es rostizado y luego cocido en una salsa a base de tomate que está llena de sabor y especias. Este pavo se merece estar en el Salón de la Fama de las recetas de pavo. Llena mis recuerdos de mi infancia con la risa y la alegría de las fiestas navideña. Ahora, como vivimos en Estados Unidos, mi mamá lo cocina ya sea para el Día de Acción de Gracias o Navidad y lo comemos con arroz y ensalada o en sándwiches más tradicionalmente conocidos como panes con chumpe. La misma salsa se ​​puede utilizar con pollos para hacer panes con pollo, los cuales se hacen con pan estilo francés, mayonesa, lechuga, tomate, berro y un suculento pedazo de pavo o pollo, que chorrea con esta deliciosa salsa. Es para chuparse los dedos.

Pavo Navideño

Necesitará:

1 pavo, cerca de 16 lbs. , descongelado, limpio, y con las piernas atadas

Puede atar las piernas del pavo con hilo de cocina, pero esto es opcional. Mi mamá se salta este paso a veces y el pavo resulta bien. Permite que la salsa llene la cavidad del pavo haciendo tanto la salsa y el pavo más gustoso. Guarde las menudencias y el cuello para hacer un caldo o salsa después. El cuello se puede hornear al lado del pavo.

Marinada y adobo:

  • ½ taza de mantequilla, derretida
  • 2 dientes de ajo, hechos puré
  • 2 cucharadas de mostaza
  • 1 cucharadita de sal
  • 1 cucharadita de pimienta molida
  • 1 taza de vino blanco

Salsa:

  • 15 tomates Roma
  • 1 cebolla, pelada y cortada en cuartos
  • 3 chiles verdes, sin semillas y en cuartos (o picados en trozos grandes)
  • 1 chile rojo, sin semillas y en cuartos
  • 2 dientes de ajo, pelados y machacados
  • 2 tazas de caldo de pollo
  • 1 tarro de 5.5 oz de aceitunas españolas rellenas de pimiento, escurridas
  • 1 tarro de 2.5 oz de alcaparras, escurridas

Mezcla de especias para la salsa (en El Salvador se le conoce como relajo):

  • 2 cucharadas de semillas de calabaza (pepitorias)
  • 2 cucharadas de semillas de sésamo (ajonjolí)
  • 1/2 cucharadita de clavos de olor
  • 3 hojas de laurel
  • 1 cucharada de orégano
  • 1 chile guaque o guajillo seco, sin semillas
  • 1 chile ciruela o pasilla seco, sin semillas
  • 1 cucharada de pimienta inglesa entera (pimienta gorda)
  • 2 cucharadas de cacahuetes, sin sal
  • 1 cucharadita de tomillo seco
  • 1 cucharadita de comino molido
  • 1 cucharadita de achiote molido o pimentón

Para marinar el pavo:

Mezcle los ingredientes de la marinada y el adobo, excepto el vino, hasta formar una pasta. Frote el pavo con esta pasta. Coloque el pavo en una fuente para horno grande o una bolsa zip lock y verter el vino en todo el pavo. Cubra bien y deje que se marine en la nevera toda la noche.

Para hacer la salsa:

Frote una sartén o cacerola con un poco de aceite y ase los tomates junto con las cebollas y los chiles. Póngalos a un lado.

A continuación, en la misma sartén aceitada, tueste todas las especias hasta que estén ligeramente doradas y el aroma llene toda su cocina. Tostar las especias ayuda a intensificar todos los sabores.

Licúe los tomates, la cebolla, 2 dientes de ajo, los pimientos y, todas las especias. *Es posible que tenga licuar por pocos y añadir caldo de pollo para diluir la salsa, aproximadamente 2 tazas.

Vierta la salsa de tomate en una olla grande. Sazone con sal y pimienta al gusto. También se le puede agregar una pizca de azúcar para reducir la acidez de los tomates. Cocine sobre fuego medio-bajo durante 30 minutos, revolviendo ocasionalmente.

Para hornear el pavo:

Precaliente el horno a 350°F. Coloque el pavo con la pechuga hacia abajo junto con la marinada en una fuente para hornear, pero no sobre una rejilla. Hornear durante 3-4 horas, dando vuelta el pavo cada hora para rostizar todos los lados de manera uniforme. Mojar el pavo cada 30 minutos con sus propios jugos de la parte inferior de la fuente y también con un poco de salsa de tomate. Vierta las aceitunas y las alcaparras escurridas sobre el pavo y en la salsa en la fuente para hornear durante la última hora de cocción . Si las patas y las alas se están rostizando demasiado rápido, cúbralas con papel de aluminio para protegerlas del calor y continuar horneando el pavo. Debido a que este es un pavo muy blando y jugoso, debe dejarse en la fuente para hornear al servir. Puede desmoronarse si se intenta poner todo en una bandeja.

Advertisement

Mini Lemon Meringue Tarts

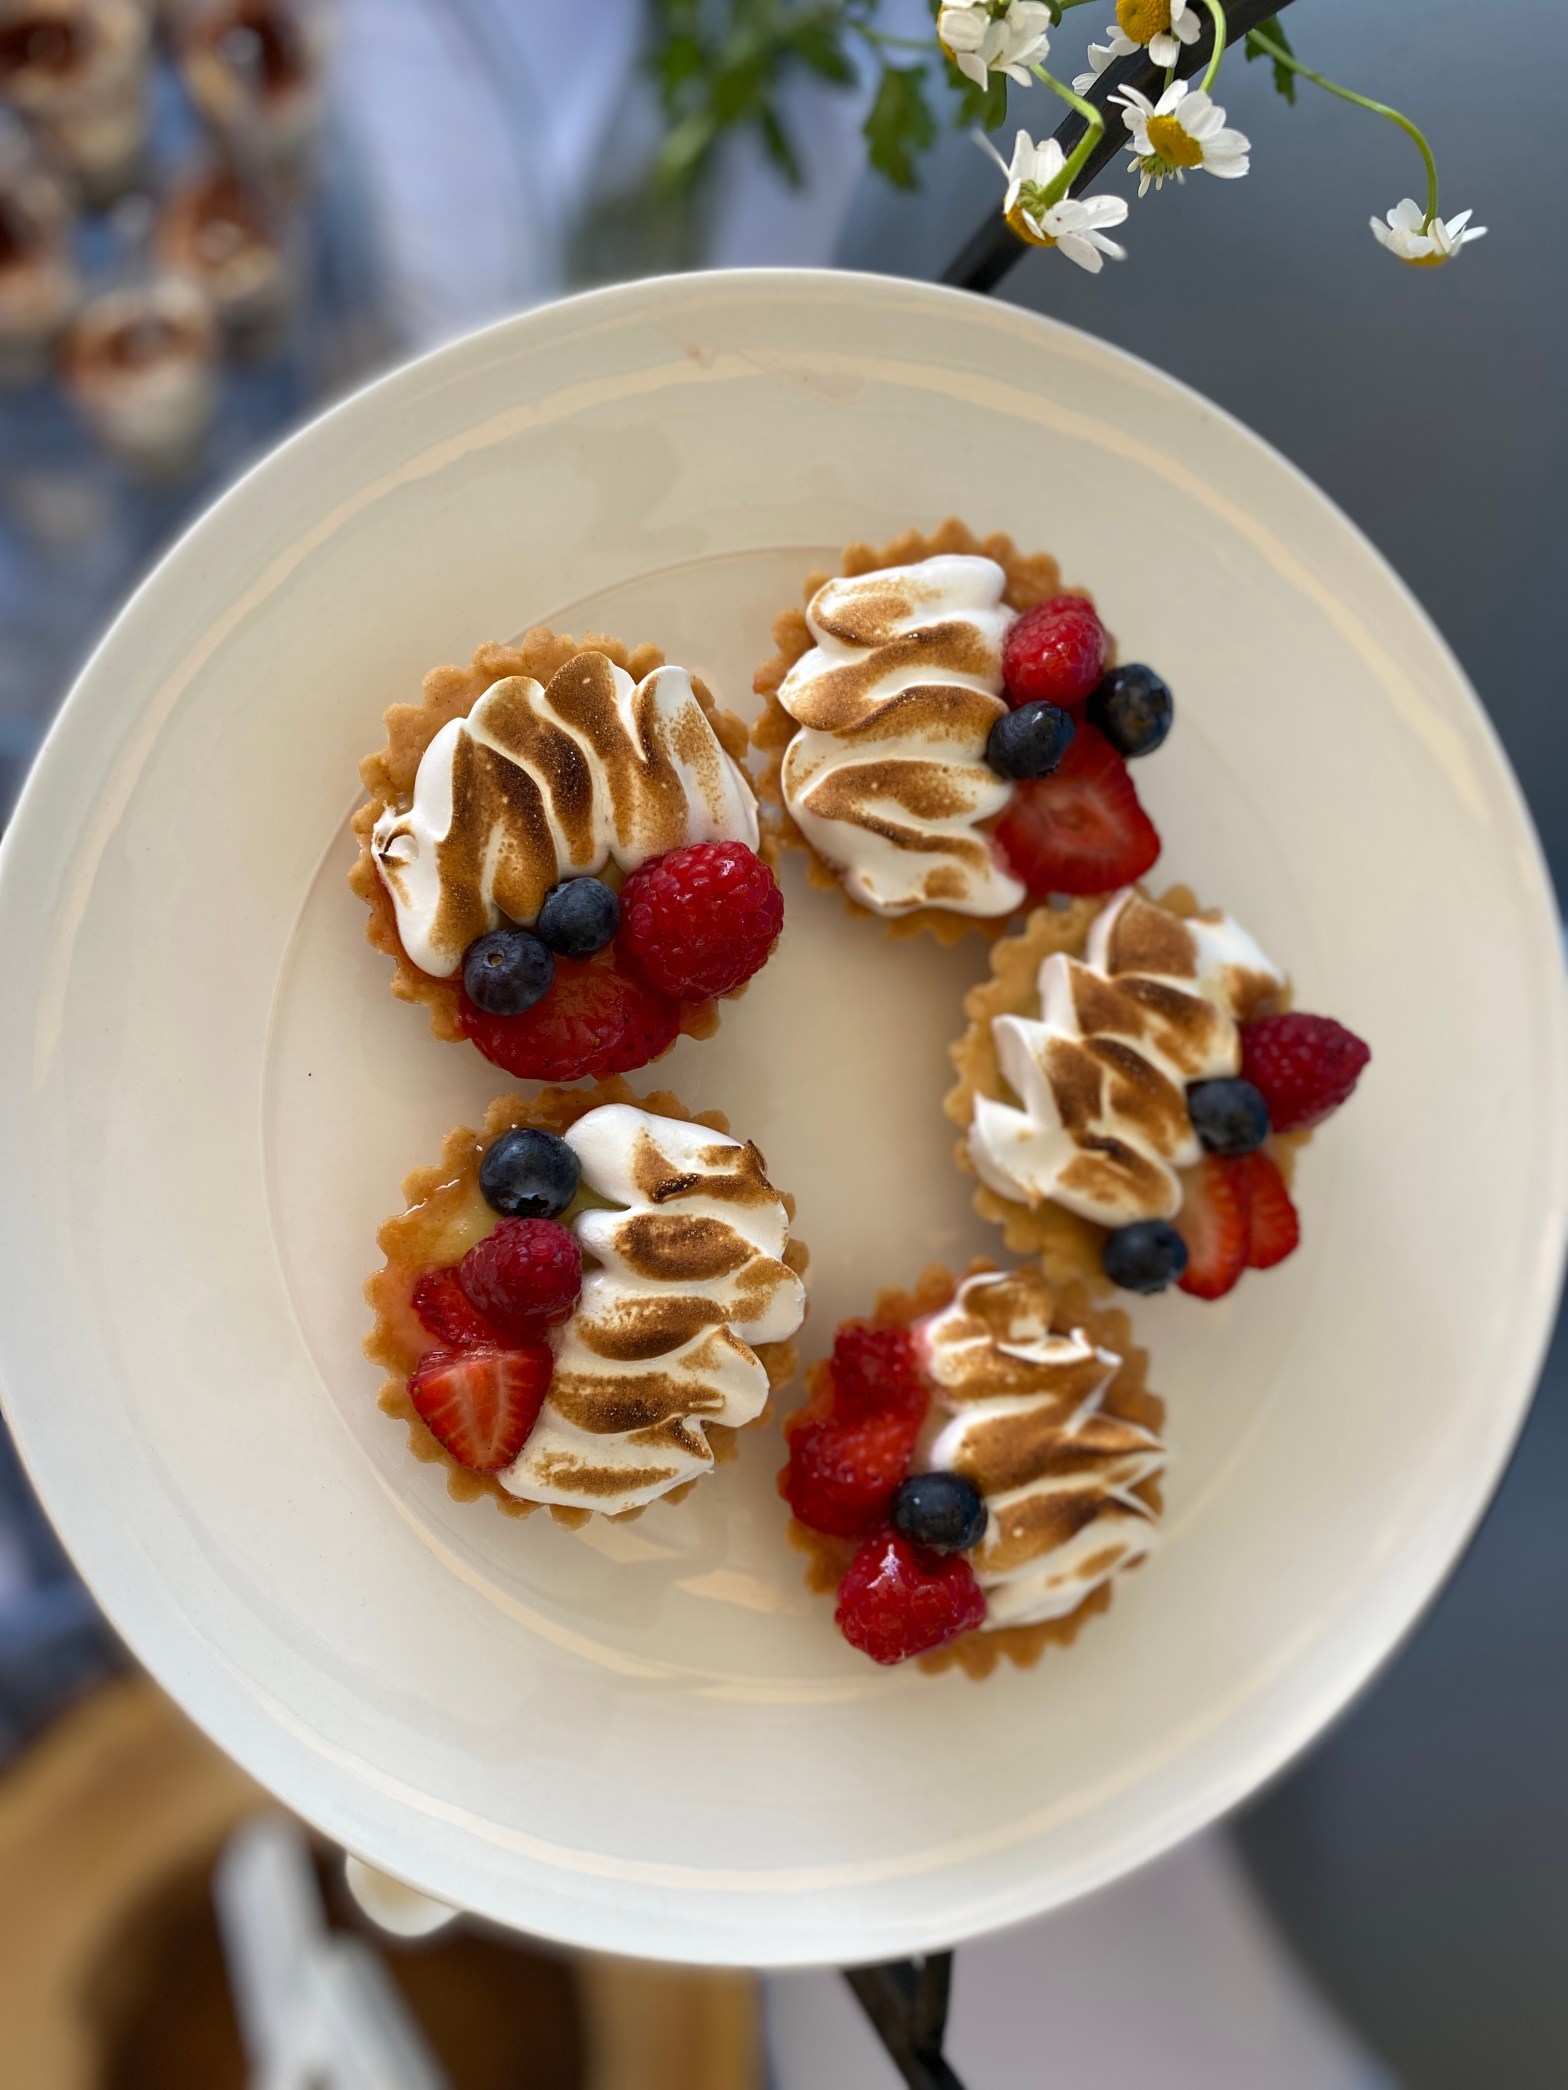
Short and sweet rings true for these little tarts. The shortbread crust is quick and easy to make, and the tartness of the lemon curd pairs well with the sweetness of the meringue, making it a tangy and distinctly palate pleasing treat.

I was able to snap some quick photos of the mini lemon tarts I made for my sister-in-law’s baby shower.

Ingredients

For 12 mini tarts

For the crust:

  • 1 cup room temperature butter, salted or unsalted
  • 1/2 cup sugar
  • 1 teaspoon vanilla
  • 2 cups all purpose flour or pastry flour
  • 1/4 teaspoon of salt if using unsalted butter

Optional: Berries such as small strawberries, raspberries and blueberries.

Easy Lemon Curd

To make the process a little bit easier I highly recommend making the lemon curd at least a day in advanced. Lemon curd needs time to set in the fridge. It will thicken up as it gets colder so don’t worry if at first it seems a little runny.

For the Meringue:

  • 3 egg whites
  • 1/2 cup granulated sugar

Instructions:

Preheat the oven to 300° F.

Using a mixer or whisk, cream together the butter, sugar, and vanilla. Add flour and salt and mix well. Press the dough into mini tart pans and place them on a baking sheet. If the dough seems too soft, put it in the fridge for 15-30 min.

Bake the mini tart shells for 10-15 minutes or until golden like sugar cookies. Allow the mini tart shells to cool completely on a cooling rack before removing them from the tart pans.

Meringue using double boiler method:

  • Fill a sauce pot with a couple of inches of water and bring to a simmer.
  • In the mixer bowl, whisk together the egg whites and sugar. Place the bowl on top of the pot of simmering water.
  • Whisk the egg whites continuously until all the sugar is dissolved and the mixture feels warm and smooth between your fingers. This takes a little arm muscle.
  • Remove the bowl from the pot and attach to the stand mixer to whisk the egg whites on high speed until it becomes stiff peaks, about 5-7 minutes. A hand mixer also works.
  • I highly recommend transferring the meringue to a piping bag only right before use. It helps to rewhip the meringue as it may lose some of its volume and shine if it sits too long in a bowl or piping bag.

To assemble the mini-tarts:

Spoon lemon curd into the cooled mini-tart shells. Top with berries if you would like. I like to leave some room for the meringue.

Pipe meringue using any tip of your choice. Use a kitchen torch to toast the meringue. This is my favorite part!

Lomo Relleno

Stuffed Beef Tenderloin

Lomo relleno is a stuffed beef or pork tenderloin. We prefer to make a beef tenderloin for special occasions because it is a pricey cut of meat. Pork is a more economical option, but also very tasty. It is a very special dish that requires a little bit of time and love. We make this for Christmas or New Year’s Eve for a fancy family dinner. It is a nice break from turkey and the beef and red wine are a nice variation using the same traditional Salvadorian sauce that we make for turkey, chicken and tamales.

The process begins with cutting the meat open and pounding it thin. Then you stuff it with a meat and vegetable filling, and finally roll it and tie it. It is then roasted in the oven and basted with the traditional tomato sauce, the same type we use for the holiday turkey. It is traditionally served with rice and salad, but any of your favorite sides are just as good. Mashed potatoes and steamed vegetables would go really well with this meat because it is saucy and juicy.

For Christmas we made three beef tenderloins. Luckily I took some quick photos to show you here. Nothing fancy, but hopefully you get the idea:

Let’s begin with the filling which I advise making a day ahead because it is easier to stuff the loin with cold filling. I also highly suggest making the sauce a few days ahead to make this process less labor-intensive on the special day of your meal.

Relleno or filling, also known as picadillo:

  • 1 onion, finely chopped
  • 1 garlic clove, finely chopped
  • 1 red bell pepper, finely chopped
  • 1/4 cup tomato paste
  • 2 bay leaves
  • 1 teaspoon cumin
  • 2 teaspoons oregano
  • 1 lb ground beef or turkey
  • 1 medium carrot, diced into tiny cubes
  • 1 potato, diced (about 1 cup)
  • 1/2 cup pimento stuffed Spanish olives, whole
  • 1 small jar capers
  • Brine liquid from the capers and olives
  • 1 tablespoon Worcestershire Sauce
  • 1/4 dry white wine or any wine you have
  • Salt & Pepper to taste

Traditional Salsa Criolla (same as you would make for a turkey): https://salvikitchen.com/2014/05/13/salvadorian-christmas-turkey/

Beef Tenderloin:

  • 2 lb (or approximately) Beef Tenderloin
  • 3 tablespoon olive oil
  • Salt & Pepper
  • 2 tablespoons Worcestershire Sauce
  • 1/2 cup red wine

Directions:

  1. To prepare the filling, heat oil a large skillet. Begin by cooking the onions, bell pepper, oregano, cumin, tomato paste and garlic until slightly brown.
  2. Add the ground meat, carrots and potatoes and stir to mix it in with the other ingredients. Cook stirring occasionally for 5 minutes, breaking up the chunks of meat. Season with salt, pepper and Worcestershire sauce.
  3. Next, stir in the olives, capers and add wine and a little bit of the brine liquid from the olives and capers. The brine liquid will add a little saltiness to the mix so keep that in mind when you season with salt. There is really no way to mess up this picadillo recipe unless you salt it too much or burn it.
  4. *A note about tomato paste: Tomato paste adds an intensity of flavor and subtle sweetness to this recipe. It isn’t meant to make a tomato-y filling. This depth of flavor also comes from cooking the tomato paste along with the onions and spices. That is your initial base of flavor.
  5. Cook the mixture until the liquid is mostly evaporated and the meat is cooked through. Taste to adjust the salt level. Store in the fridge for later use or cool completely before stuffing your tenderloin.
  6. Preheat the oven to 425°F.
  7. To butterfly the loin, cut in the middle but not all the way through. Open it like a book, then make additional cuts on the left and right sides. Cover the meat with plastic wrap and pound it until it is somewhat even and thin.
  8. Season the meat with salt, pepper, and Worcestershire sauce.
  9. Spread the filling evenly over the meat and roll. Secure with kitchen twine or toothpicks.
  10. Heat oil in a cast iron skillet or Dutch oven and sear the meat on all sides. Any skillet works, but it is best to use one that can handle high heat. Deglaze the pan with red wine.
  11. Place the loin in a roasting pan, pour the red wine from the pan on top, and bake covered with aluminum for 30 minutes or until it reaches desired doneness. Use a meat thermometer as your guide. We baked ours for 45 minutes for medium-well.
  12. The last step is to pour the sauce and a few olives on the beef loin. Bake uncovered for an additional 15 minutes. Allow it to rest before removing the strings. Slice the roasted beef tenderloin and serve.

Pupusas Gourmet

A new generation of Salvi food…

La Margarita

Salvadorians have definitely made their mark in the gastronomic history of the world. Food is comforting and brings people together, no matter what your background is. Sharing a plate of food made with love transcends international barriers and heals broken hearts.

Pupuserias have been popping up all over the U.S. ever since Salvadorians started migrating here. Pupusas (and curtido) are to Salvadorians what tacos are to Mexicans, or Kimchi to Koreans, and … you get the picture. 

My mom did most of the work for the first draft of this post because my youngest was 3 months old at the time and our four year old was equal to three kids so life was busy at the time. But I did collaborate with my mom to come up with some new flavors. In pupuserias in El Salvador cooks have started to really experiment with some new ingredients in the past few years. Anything goes as long as you mix it with some cheese or beans. Those two components meld everything together so the ingredients will stay in the dough. If you can put it on a pizza then it can also go in a pupusa. We made la Margarita, filled with Asiago cheese, fresh basil, and tomatoes. This, my friends, was even better than pizza. The cheese was perfectly melted and some of it oozed out of the pupusa and toasted on the pan during cooking. Just get out of the box and do something nontraditional and unconventional. I’m sure there’s plenty of other blogs out there with pupusas revueltas. Why not try something different? Unless you do this every now and then, you will never know what you’re missing out on.  

A few years after the first draft…

Ingredients for the masa dough: 

Masa:

  • 2 lb package white corn meal or corn masa flour
  • Cool water, approximately 1 cup of water to 1 cup of cornmeal

Mix the water and flour. Knead until smooth. Add more water as needed. The dough should be soft and not too sticky. If it cracks when you form the pupusas you will need to add a little more water and oil your hands.  

Curtido and Salsa 

Filling Ingredients for Pupusa Margarita: 
  • Asiago cheese, grated and slightly softened (in the microwave)
  • Thinly sliced fresh basil (chiffonade)
  • Finely chopped roma tomatoes, deseeded 

Mix the cheese, basil, and tomatoes. The mixture should be a bit warm and compacted so it’s easier to form a ball that will go in the middle of the pupusa. 

Filling Ingredients for Revueltas: 
  • About 2 cups refried beans, cooked slowly to a thick pasty consistency
  • 1 1/2 cups chicharrón (pork butt that has been cooked in its own fat, can also use Mexican carnitas) 
  • Chopped onion, tomato, and bell pepper
  • 2 cups mozzarella cheese, grated and slightly softened (in the microwave)
  • Salt and pepper to taste 

Lighty fry the pork meat with onion, tomato and bell pepper. Process together until it is finely minced. Add the beans and cheese and combine. Any filling for pupusas should be processed or ground to a pasty consistency otherwise the filling ingredients will poke through the dough. If the filling is too runny it will leak and become a little sticky. 

  • Other filling ideas: Cheese and loroco (an edible flower), cheese and spinach, cheese and mushrooms, ground chicken and cheese, plain cheese, cheese and grated bell peppers, beans and cheese, shrimp, zucchini flowers and cheese, anchovies, etc. 
To form the pupusas: 

Take a little bit of dough and roll it a little bigger than a golf-sized ball. Pat it and flatten it like a tortilla and make a dent in the middle with your fingertips. It is totally fine to use a tortilla press or place the dough in between two pieces of plactic wrap and flatten with your hands. Making pupusas requires a little bit of practice. Stuff with your filling ingredients (you can use an ice scream scoop), and pinch the dough together to seal. Pat and flatten it again with hands moistened in oil and water. Cook on an oiled griddle or pan on both sides until golden and crispy.

Tip: Keep two little bowls with water and oil on the side to moisten your hands.

EN ESPAÑOL

Los Salvadoreños sin duda hemos dejado nuestra huella en la historia gastronómica del mundo. La comida une a las personas, no importando su pasado. Compartir un plato de comida hecha con amor trasciende las barreras internacionales y cura los corazones rotos. 

Las pupuserías han venido apareciendo en todo los EE.UU. desde que comenzó la migración de los salvadoreños aquí. Pupusas (y curtido) son para los salvadoreños como lo son los tacos para los mexicanos, o Kimchi para los coreanos, y pues… agarras la onda.

Mi mamá hizo la mayor parte del trabajo para el primer boceto de este post porque mi niña mas pequeña tenía 3 meses de edad y nuestra hija de cuatro años era igual a tres niños. Estabamos ocupadísimos en esos primeros años. Pero sí tuve tiempo de inventarme unas nuevas ideas para colaborar con mi mamá. En las pupuserias de El Salvador han comenzado a experimentar con algunas ideas nuevas en los últimos años. La idea es que todo vale, de verdad! Si se puede poner en una pizza, entonces también puede ir en una pupusa. Hicimos la Margarita, rellena con queso Asiago, albahaca fresca, y tomates. Esto, mis amigos, fue incluso mejor que una pizza. El queso se derritió a la perfección y un poquito queda tostadito en el comal. Muy rico. Estoy segura de que hay un montón de otros blogs por ahí con pupusas revueltas. ¿Por qué no probar algo diferente? A menos que hagas esto de vez en cuando, nunca sabrás de lo que te estás perdiendo. 

Ingredientes para la masa: 
  • 1 paquete de 2 libras de harina de maíz blanco o harina de masa de maíz
  • Agua fría, aproximadamente 1 taza de agua por cada taza de harina

Mezclar el agua y la harina. Amasar hasta que quede suave. Añadir más agua si es necesario. La masa debe quedar suave y no demasiado pegajosa. Si se raja cuando se forman las pupusas tendrá que añadir un poco más de agua y aceitar sus manos.  

Curtido y Salsa 

Relleno para la pupusa Margarita: 
  • Queso Asiago, rallado y un poco suavizado (en el microondas) 
  • Albahaca fresca en tiras finas (chiffonade)
  • Tomates roma finamente picados, sin semillas

Mezclar el queso, albahaca y tomates. La mezcla debe estar un poco calientita y compacta por lo que es más fácil para formar la pupusa. 

Relleno para las famosas Revueltas: 
  • Alrededor de 2 tazas de frijoles refritos, cocidos lentamente hasta obtener una consistencia pastosa (lo que conocemos como frijoles colochos) 
  • 1 1/2 tazas de chicharrón (lomo de cerdo que se ha cocido en su propia grasa, también puede utilizar carnitas mexicanas) 
  • Cebolla, tomate y chile verde picados
  • 2 tazas de queso mozzarella rallado y un poco suavizado (en el microondas)
  • Sal y pimienta al gusto 

Sofreír el chicharrón junto con la cebolla, el tomate y chiles. Procesar o moler finamente. Añada los frijoles y queso. Cualquier relleno para pupusas debe ser molido hasta obtener una consistencia pastosa de lo contrario los ingredientes del relleno se salen de la pupusa. Si el relleno está demasiado aguado se pone todo pegajoso y no se puede formar la pupusa. 

Otras ideas para rellenos: queso y loroco, queso y espinacas, queso y champiñones, carne picada de pollo, solo con queso, queso y chile verde, frijoles y queso, camarón, flores de calabacín y queso, anchoas, etc. 

Para formar las pupusas:  

Tomar un poco de masa y hacer una bola, un poco más grande que una pelota de golf. Palmear y aplanar como una tortilla y ahuecar en el centro con los dedos. Está totalmente bien utilizar una prensa para tortillas o colocar la masa entre dos pedazos de plástico y utilizar su mano o un plato para aplanar. Hacer pupusas requiere un poco de práctica.

Rellenar con sus ingredientes de relleno (puede usar una cuchara para servir helado) y unir las orillas de la masa para sellar. Palmear y aplanar de nuevo con las manos humedecidas en aceite y agua. Cocinar las pupusas en una plancha o comal engrasado hasta que estén doradas y crujientes por ambos lados.

Recomendación: Mantener dos recipientes pequeños con agua y aceite a un lado para humedecer las manos.

Pastelitos

Pastelito means little pie and it’s the Salvadorian version of empanadas. Empanadas are well known all over Latin America. Greeks, Italians, and other Europeans make meat pies, too. There is something really comforting about a crusty piece of dough filled with meat or veggies. I don‘t know anyone who would turn down the opportunity to eat such a tempting snack. These Salvadorian pastelitos are made with corn masa and fried, whereas most other meat pies are made with some kind of wheat-based pastry and then baked. Pastelitos are actually considered street food in El Salvador. This is what you get at the bus stop on your way back home after a long day. Whenever we serve little empanadas as appetizers at parties, they‘re gone within seconds.

For the masa:
  • 4 cups of Maseca flour
  • 1 teaspoon salt (or more to taste)
  • 2 teaspoons achiote
  • 3-4 cups room temperature chicken stock or water
  • 1 teaspoon baking powder

Mix all the masa ingredients with your hands in a large bowl. Add more stock or water as needed to make the dough soft and moist but not sticky. You will need to keep a bowl of water and a little bowl of oil on the side to moisten your hands when working with the dough. Make approximately 24 golf sized balls with the dough and cover with a damp kitchen towel until ready to use.

For the picadillo filling:
  • 2 lbs. ground beef or turkey
  • 1 red or green bell pepper, diced
  • ½ onion, finely chopped
  • ½ carrot, diced
  • 5 small golden potatoes or ½ large potato, cubed
  • 1 chayote or güisquil, peeled and diced (optional, if available)
  • Grape seed or canola oil
  • Salt and pepper to taste

Drizzle a little oil in a skillet and brown the ground turkey, making sure to season it with salt and pepper. Add all the chopped veggies and mix together. Cover and cook on low-medium heat, mixing occasionally, until the onions are translucent and the carrots and potatoes are soft. Set aside and allow it to cool before making the pastelitos.

Curtido:
  • 1 head of cabbage, finely sliced
  • 1 large carrot, grated
  • 1 bell pepper, thinly sliced or julienned
  • ½ onion, thinly sliced
  • ¾ cup apple cider vinegar
  • 2 teaspoons dried oregano
  • 4 bay leaves
  • Salt and pepper to taste
  • 4 cups of boiling water or enough to cover the cabbage mix
  • 1 small can pickled jalapeños (optional)
  • A drizzle of olive oil

Curtido can be made a few hours or days in advanced. It will last up to 2-3 weeks in your fridge in an airtight container, or longer if canned properly. Begin by thinly slicing and grating all the veggies with a sharp knife, mandolin, or food processor. Put all the veggies in a large glass bowl and pour boiling water over the entire mix. Season with salt. Let the cabbage mix sit for 10-15 minutes to blanche or to partially cook the ingredients. Drain most of the water, reserving about a ¼ cup. Add vinegar, oregano, drizzle of olive oil, and pickled jalapeños. Mix and season with salt and pepper to taste. Add a pinch of sugar to cut the tartness of the vinegar if necessary.

Traditional Tomato Salsa:

6 plum or Roma tomatoes

1 small onion

1 bell pepper

1 jalapeño pepper (optional)

½ teaspoon dried oregano

Salt and pepper to taste

Optional: Achiote and chicken bouillon

Boil or roast the tomatoes, onion, and bell pepper. Season with salt and pepper. Blend all the ingredients together until smooth. You can add water or chicken stock to thin out the sauce. Salvadorian salsa should be a bit runny. A pinch of sugar will cut the tartness of the tomatoes if needed.

To make pastelitos:

Flatten each ball of dough with moist hands or using a tortilla press. I always dip my hands in water and a little oil when making tortillas. Fill each tortilla with meat picadillo using an ice cream scooper or spoon. Fold the tortillas over, pinching the edges with your fingers to carefully seal the empanada. Fry the pastelitos in plenty of oil until crisp and golden. Drain the excess oil by placing them on paper towels.

*Tip: cook on medium heat and always use caution when deep-frying.

EN ESPAÑOL

Los pastelitos son la versión salvadoreña de las empanadas que son bien conocidas en toda Latinoamérica. Los griegos, italianos y otros europeos hacen pasteles de carne también. Un pastelito crujiente relleno de carne o verduras es muy reconfortante. Yo no conozco a nadie que rechazaría la oportunidad de comerse un bocadillo tan tentador. Estos pastelitos salvadoreños están hechos con masa de maíz y fritos, mientras que la mayoría de los otros pasteles de carne se hacen con algún tipo de masa a base de trigo y son horneados. Los pastelitos realmente son bocadillos de la calle en El Salvador. Se venden en la parada del bus y se comen en el camino de vuelta a casa después de un largo día en el trabajo. Nosotros a veces servimos pastelitos como aperitivos en las fiestas y desaparecen en cuestión de segundos. Cada vez que hacemos curtido y algo hecho con masa y carne es una ocasión especial en nuestra cocina salvadoreña.

Para la masa: 
  • 4 tazas de harina Maseca 
  • 1 cucharadita de sal
  • 2 cucharaditas de achiote en polvo
  • 3-4 tazas de caldo de pollo o agua
  • 1 cucharadita de polvo de hornear

Mezclar todos los ingredientes de la masa con las manos en un tazón grande. Añadir más caldo o agua, según sea necesario para hacer la masa suave y húmeda, pero no pegajosa. Mantener un recipiente con agua y un poco de aceite a un lado para humedecerse las manos cuando se trabaja con la masa. Hacer aproximadamente 24 bolitas del tamaño de pelotas de golf con la masa y cubrir con una manta húmeda hasta que esté listo para su uso.

Para el picadillo:
  • 2 libras de carne molida de res o pavo
  • 1 chile verde picado
  • ½ cebolla, finamente picada
  • ½ zanahoria, cortada en cubitos
  • 5 papas pequeñas o ½ papa grande, en cubitos
  • 1 chayote o güisquil, pelado y cortado en cubitos (opcional, si lo puede obtener)
  • Aceite de semilla de uva o canola
  • Sal y pimienta al gusto

Rociar un poco de aceite en una sartén y dorar la carne de pavo molida, asegurándose de sazonar con sal y pimienta. Añadir todas las verduras picadas y mezclar todo junto. Tape y cocine a fuego mediano, mezclando ocasionalmente, hasta que la cebolla esté cocida y las zanahorias y las papas estén blanditas. Deje que el picadillo se enfríe antes de hacer los pastelitos.

Curtido:
  • 1 repollo, finamente rallado o rebanado
  • 1 zanahoria grande, rallada
  • 1 chile verde campana, en rodajas finas o en juliana
  • ½ cebolla, cortada en rodajas finas
  • ¾ de taza de vinagre de sidra de manzana
  • 2 cucharaditas de orégano seco
  • 4 hojas de laurel
  • Sal y pimienta al gusto
  • 4 tazas de agua hirviendo o lo suficiente para cubrir la mezcla de repollo
  • 1 lata pequeña de jalapeños en escabeche (opcional)
  • Un chorrito de aceite de oliva

El curtido se puede preparar unas pocas horas antes o con días de anticipación. Durará hasta 2-3 semanas en el refrigerador en un recipiente hermético, o más si lo conservas correctamente. Comience por cortar finamente y rallar todas las verduras con un cuchillo afilado, mandolina, o procesador de alimentos. Poner todas las verduras en un recipiente grande de vidrio y verter agua hirviendo sobre la mezcla completa. Sazonar con sal. Deje que la mezcla repose durante 10-15 minutos para medio cocer los ingredientes. Escurrir la mayor parte del agua, reservando un ¼ de taza. Añadir el vinagre, el orégano, hojitas de laurel, el chorrito de aceite de oliva, y jalapeños en escabeche. Mezclar y sazonar con sal y pimienta al gusto. Añadir una pizca de azúcar para reducir la acidez del vinagre si es necesario.

Salsa de tomate tradicional:
  • 6 tomates
  • 1 cebolla pequeña
  • 1 chile verde campana
  • 1 chile jalapeño (opcional)
  • ½ cucharadita de orégano seco
  • Sal y pimienta
  • Opcional: achiote y consomé de pollo

Hervir o asar los tomates, la cebolla y el chile. Sazonar con sal y pimienta y licuar todos los ingredientes. Si quiere puede añadir agua o caldo de pollo para diluir la salsa. La salsa salvadoreña es supuesto que quede un poco liquida. Una pizca de azúcar reducirá la acidez de los tomates, si es necesario.

Para hacer los pastelitos:

Aplanar cada bola de masa con las manos húmedas para formar tortillas. Siempre mojo mis manos en agua y un poco de aceite para trabajar con la masa. Rellenar cada tortilla con picadillo de carne usando una cuchara de helado o una cuchara normal. Doble las tortillas y pegue bien los bordes con los dedos. Freír los pastelitos en abundante aceite hasta que estén crujientes y dorados. Escurrir el exceso de aceite poniéndolos sobre papel toalla.

*Consejo: cocinar a fuego mediano y siempre tenga cuidado al freír. 

Choripanes con escabeche

The humble hot dog gets a new make-over. Evidently, every region and country has its own version of a sausage and a bun. Sometimes I crave a hot dog with just mayo, ketchup and mustard. I respect that kind of simplicity. Other times, I want something with a little more bite and acidity that cuts through the richness of wieners and sausages.

I have a fond memory of a choripan I ate in El Cerro Verde, El Salvador. The word choripan is a combo of the words chorizo, which means sausage, and pan which means bread. The concept is similar to a hot dog, or a German bratwurst with sauerkraut. The relish is made of an escabeche or pickled veggies dressed with a little Dijon mustard and mayonnaise.

Ingredients for Salvadorian Escabeche (for about 4 hot dogs):

  • 1 carrot, julienned (I used 2 small tricolor carrots)
  • 1 can sliced jalapeños, reserve 1 tablespoon of vinegar from the can
  • 1 sliced onion
  • 1 red, yellow or orange bell pepper, julienned
  • 1 bay leaf
  • 1/2 teaspoon dried oregano
  • 1/4 teaspoon dried thyme
  • 1/2 teaspoon Worcestershire sauce
  • 2 tablespoons mayonnaise
  • 1 teaspoon Dijon mustard
  • Salt and pepper
  • Olive oil

Preparation:

Stir-fry the onions in a little bit of oil until slightly translucent. Add the rest of the veggies, bay leaf, oregano and thyme. Continue to stir-fry and sprinkle in about one tablespoon of the vinegar from the jalapeños and about 1/2 teaspoon of Worcestershire sauce. Stir in the mayo and mustard and toss to coat all the veggies. Season with salt and pepper. Remove from the heat and use immediately as a topping for hot dogs or sandwiches. The carrots and bell pepper should be crispy al dente.

You will need really good hot dog buns such as brioche, and hot dogs or sausages of your choice. I used a turkey hot dog pictured below. It was yum and with all those veggies.

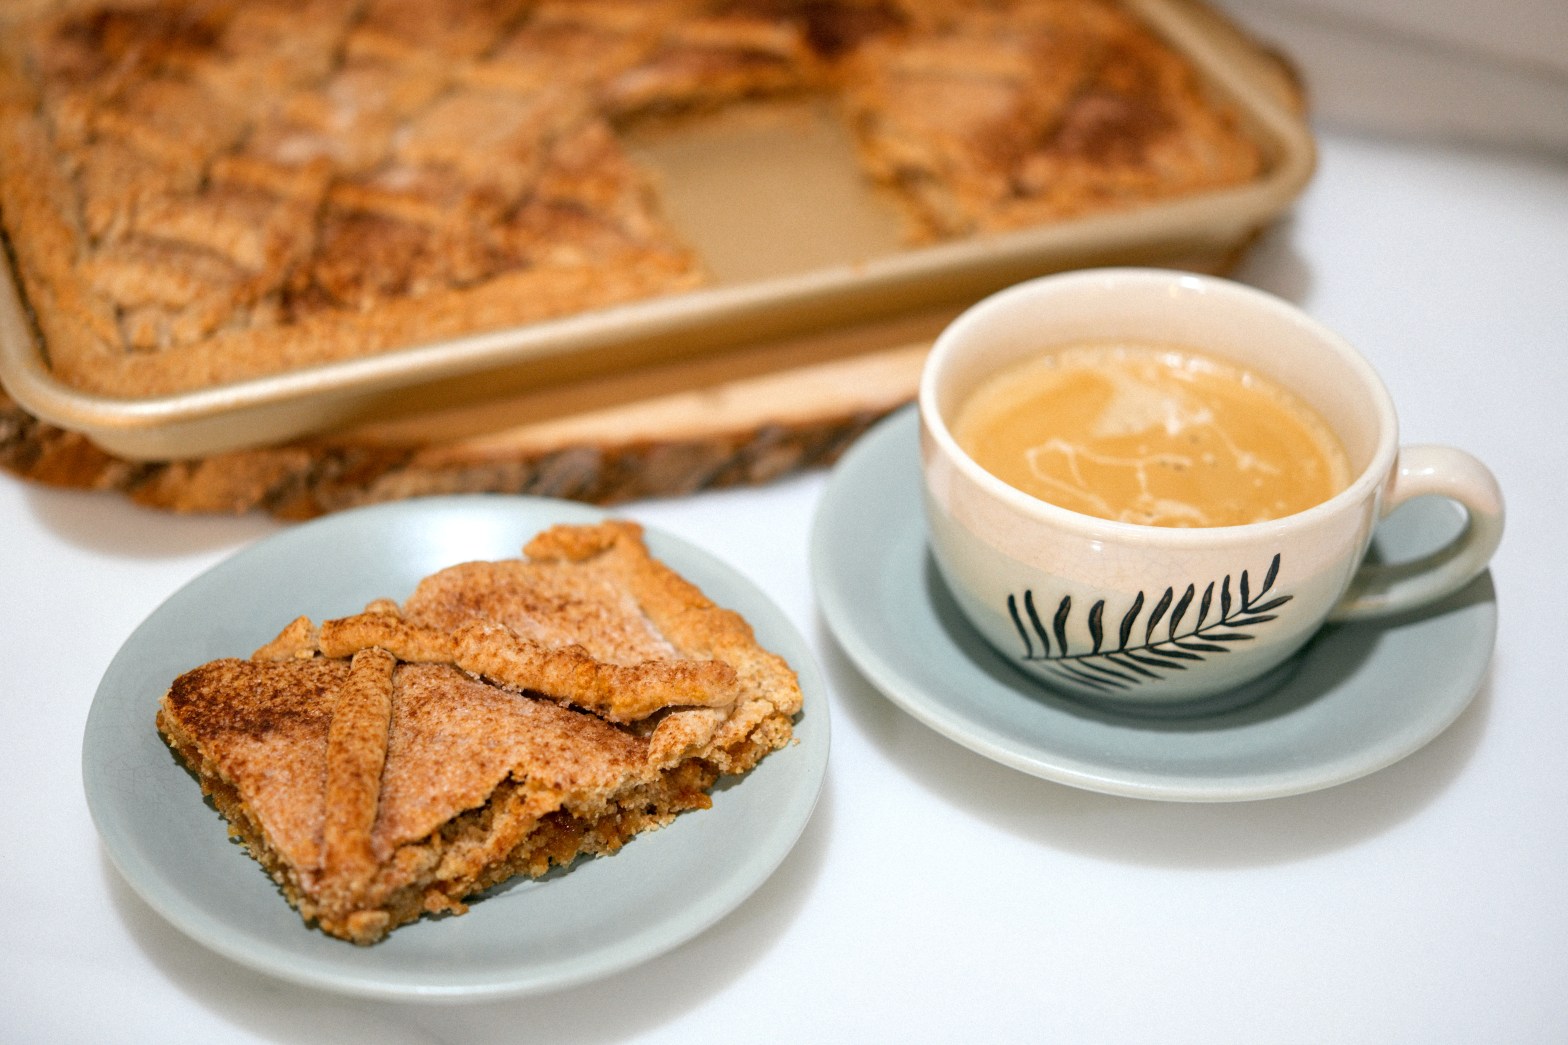
Salvadorian Quesadilla

Authentic Salvadorian quesadilla is warm afternoon treat traditionally paired with a good cup of coffee. It should have a subtle cheesy/creamy taste and the texture is sort of like cornbread, slightly grainy from the rice flour and sweetened with sugar, but not like a cake. The cheese used in my recipe is queso fresco which is mild as opposed to hard cheeses. I have tasted quesadillas made with hard cheese and I find that for my taste, parmesan sweet bread is just too strong.

When visiting El Salvador we often drop by a roadside restaurant called La Posada in La Libertad, where quesadillas are made in a wood-fired oven. It’s a very artisanal way of making them. It’s similar to the difference between pizza made in a commercial oven vs pizza made in a wood-fired brick oven. Artisanal quesadillas have a slightly darker color all around from the heat of the terra-cotta ovens. It’s the kind of flavor that you want to capture and replicate.

An authentic Salvadorian quesadilla baked in a wood-fired oven near La Libertad.

The ingredients in El Salvador are natural and fresh and I tried to mimic those flavors the best I could, opting for crème fraîche instead of “Salvadorian” sour cream from the Latino market. Unfortunately, most brands of Salvadorian cream I have found contain additives and it’s just not the real deal. Real Salvadorian cream is the naturally cultured cream top of freshly milked milk. That’s it. So the cream that is the closest thing to Salvadorian cream is actually crème fraîche. I also used high fat 6% A2/A2 whole milk which you can find at specialty stores like Wholefoods.

Ingredients:
  • 1 10 oz queso fresco, crumbled or grated
  • 2 cups sugar
  • 1 cup (8 oz tub) crème fraîche (or crema)
  • 1 egg (you may add 2 eggs that can be whipped and gently folded into the mixture for a more cake-y, airy consistency)
  • 1 lb (2 cups) rice flour
  • 1 tablespoon baking powder
  • 1 12 oz bottle (1 1/2 cups) 6% milk (extra cream top) or whole milk
  • Sesame seeds to garnish
Preparation:
  1. Preheat the oven to 350°F.
  2. Crumble the cheese using your hands or use your mixed with the paddle attachment.
  3. Add the sugar, cream, and egg. Mix until well combined.
  4. Add the flour and mix on the lowest speed. Slowly add the milk until you end up with batter similar to pancake batter.
  5. Pour the batter in greased baking pans or tins and sprinkle with sesame seeds. I used three 7″ pans plus one 6″ pan because that’s what I had on hand. However, you may use any size pan or baking dish as long as you spread out the batter thinly and evenly. Quesadillas are supposed to be roughly 1 inch thin more or less.
  6. Bake for 30 minutes or until golden brown. I baked my quesadillas for roughly 35-40 minutes.

Egg Crêpes

I was recently contemplating the idea of having some chickens in our small backyard to get some fresh eggs, and after some research, I came to the conclusion that our yard is too small and that it is easier just to buy them. It seemed like a worthwhile endeavor at first because I love eggs so much. I especially like the fresh organic eggs from the farmer’s market because they reminds me of the quality of eggs you get in Europe with almost orageish yolks.

Eggs are versatile and can be cooked in so many different ways for any kind of meal, not just breakfast. In this recipe, the eggs crêpes have a turkey filling, but you could add other ingredients as well. So whatever you have on hand like maybe some ham, cheese, or even left over beef stew would all work here.

Ingredients:

For the crêpes:
  • 6 eggs (for 12 crêpes)
  • 1/3 heavy cream (optional)
  • salt and pepper
  • Olive oil cooking spray or butter (your choice)
Preparation:
  1. Whisk the eggs, cream (if using), salt, and pepper in a large measuring cup or bowl. *I like using a measuring cup because it easier to pour the egg.
  2. Heat a small (6 inch) nonstick skillet over medium-low heat and spray with cooking spray or melt a dab of butter.
  3. Pour close to 3 tablespoons of egg mixture into the center of the skillet, swirling to coat the bottom of the skillet evenly just like a regular crêpe. Once the egg is set, carefully flip the crêpe and cook the other side for about 30 seconds. Transfer the cooked crêpe to a plate and repeat the process. You get about 2 crêpes per egg.
For the ground turkey filling:
  • 1 lb ground turkey
  • onion, chopped
  • bell pepper, chopped
  • Worcestershire sauce
  • 1 8oz can tomato sauce (regular or spicy)
  • 1 cup water or stock
  • 2 cups fresh spinach leaves
  • Olive oil cooking spray (or choice of fat to cook with)
  • Any kind of cheese that melts like pepper jack or mozzarella
Preparation:
  1. Heat a medium skillet over medium-low heat and spray with cooking spray (or use a little bit of oil) and brown the ground turkey. Season with salt and pepper.
  2. Add the chopped onion and bell pepper. Stir and continue cooking for about 5 minutes.
  3. Sprinkle Worshcestire sauce, stir.
  4. Add canned tomato sauce and water. Cover and simmer for 10 min.
  5. Add spinach, stir and turn off the heat.
  6. Fill each crêpe with the turkey mixture and some cheese. Roll like a taco and serve.

Tortellini Soup

I love soups. Right now it’s early spring in California, but it feels a bit wintery with some rainy days here and there and 60 degree weather. I know what you’re thinking if you live in some frigid state somewhere up north. But here, 60s means it’s soup weather.

Here’s a soup that is easy and versatile. You can make different variations of it every time. This time I added some sausage, carrot and spinach because that’s what I happened to have in my fridge. You can make it with just broth or add any veggies you like. It’s really up to you and super easy to make for a quick weeknight meal .

Ingredients:

  • 4 Italian chicken sausage links, sliced
  • 1 diced carrot
  • 1/2 diced onion
  • 1 diced celery stick
  • 1 8 oz can tomato sauce
  • 1 carton chicken broth
  • Chopped fresh herbs (ex. parsley, basil, thyme, etc) or Italian seasoning
  • 1 lb cheese tortellini
  • Salt and pepper to taste
  • Fresh spinach leaves, desired amount

Preparation:

  1. Heat a soup pot and spray with some cooking spray or add a tiny bit of olive oil. Brown the sausage.
  2. Add carrots, onion, and celery stick and cook for a few minutes until the onion is translucent.
  3. Add the tomato sauce and broth. Season with salt and pepper to taste. *Sometimes the sausage is bit a salty so you may not need much salt.
  4. Add the chopped fresh herbs. Bring the soup to a boil, then reduce heat to a simmer. Cook until the carrots are tender.
  5. Add the tortellini and spinach and cook for 4-5 minutes on medium heat.
  6. Serve and enjoy.

Pork Chops With Fresh Garden Herbs

Growing your own cooking herbs is no easy feat depending on what types of herbs you use. We are not gardening pros and we are still trying to acquire a green thumb. Cilantro is by far the most delicate of all herbs I have ever tried to cultivate so I still rely on store-bought bundles which, fortunately, are pretty cheap. Here at home we enjoy growing the heartier types like mint, rosemary, thyme and lavender. Sometimes we have basil, parsley and even some romaine lettuce which you see pictured here.

Fresh herbs are great for cooking just about anything. I like the extra freshness they bring to chicken dishes, pot roasts, soups and in this case oven-roasted pork chops. A few sprigs of mint are great for making tea and for Salvadorian meatball soup.

Ingredients:

  • 4-6 bone-in loin pork chops
  • 1-2 tablespoons balsamic vinegar
  • 1-2 tablespoons olive oil
  • 1 teaspoon garlic powder
  • 1 teaspoon onion powder
  • 1 teaspoon smoked paprika
  • fresh herb bundle of your choice, chopped
  • or 2 teaspoons of dried herb mix like herbes de Provence or Italian seasoning
  • salt and pepper

Preparation:

  1. Preheat the oven to 375 F.
  2. Prepare a roasting pan by spraying with cooking spray or oil.
  3. Rub the pork chops with olive oil and balsamic vinegar and then sprinkle all over with garlic powder, onion powder, paprika, chopped herbs, salt and pepper.
  4. Arrange all the pork chops in the roasting pan. Transfer the roasting pan with the pork chops into the oven and bake for approximately 30 minutes, depending on the thickness of the pork chops.
  5. Feel free to add some carrots and/or potatoes to roast right along with the pork chops.
  6. Serve and enjoy with your favorite sides.

Semita

Out of all types of pan dulce that exist in the Salvadorian repertoire of pastries, this is by far one of my favorites. There are essentially two types of semitas that are popular in El Salvador: semita pacha and semita alta. Flat semita and tall semita. I prefer the flat semita since it’s less bready and dense. It is more like a sandwich of pie crusts with a sweet filling in the middle. When I eat a piece of pie I am all about the crust. I could honestly care much less about the filling. Just give me crust. That is why I love this semita so much. It has a crumbly crusty texture with just the right amount of filling in the middle. It is basically a rustic type of yeast pie crust.

Traditionalists will say you have to mix the ingredients and knead the dough completely by hand. The method involves starting with a well of flour on a clean surface and then incorporating the wet ingredients into the flour until you form a dough. While this method seems to be what you’ll find the most on YouTube videos, I learned that mixing the ingredients using a stand mixer works just fine and the results were better than I expected.

So where does the word semita come from? I am a true history geek at heart. I love to research the meaning and origins of things. So what I discovered is that semita could have its origins in Sephardic Jewish baking with an old Spanish etymology relating to the word bran or coarse flour. It all makes sense to me. Wheat was introduced to the New World by the Spaniards, many of whom were of Jewish descent. So fast forward to today, cafecito and pan dulce in the afternoons has become the Salvadorian tea time. It is the art of slowing down and enjoying the moment.

Ingredients

Crust:

  • 2 cups all purpose flour
  • 2 cups wheat bran (or wheat germ)
  • 1 tsp baking powder
  • 1/2 tsp instant yeast
  • 1/2 cup granulated sugar
  • pinch of salt (about 1/8 teaspoon)
  • 1 tsp cinnamon
  • 1 cup cold butter, cubed
  • 1 egg
  • 1 tsp vanilla
  • 4-10 tablespoons cold water

Filling:

  • 4 oz fruit jam
  • 5-7 oz piloncillo also known as panela or atado de dulce (unrefined whole cane sugar)

Tips: For this recipe I used our homemade persimmon jam and it turned out really good. I suggest using jams that are kind of pulpy, definitely not jelly like. Pineapple and guava jams are more traditional for semita, but you can experiment with other flavors. I am thinking apple or pumpkin butter for fall.

Preparation

  1. Preheat the oven for 3500 F.
  2. Combine flour, bran, baking powder, yeast, sugar, salt, and cinnamon in the bowl of a stand mixer fitted with the paddle attachment. Mix on lowest speed to avoid a flour explosion.
  3. Add the butter a few cubes at a time and mix until the flour looks like coarse, lumpy sand.
  4. Next, add the egg and vanilla and mix until incorporated. Slowly add cold water, starting with about 4 tablespoons (the dough shouldn’t be wet). When the dough starts to come together it is a good sign that it is moist enough. You should be able to roll a ball in your hand. It is okay to see small bits and streaks of butter in the dough.
  5. Squeeze the dough into a ball and allow it to sit in the mixer bowl until ready to use.
  6. Next, grate the piloncillo with a box grater. Butter a quarter size 9x 13 baking sheet or baking dish.
  7. Sprinkle a clean work surface with flour and knead the dough until it is pliable enough to roll out. Sprinkle with flour as much as necessary.
  8. Reserve a little bit of dough to roll out “snakes” to decorate the semita with a lattice. It doesn’t have to be as elaborate as a traditional lattice for a pie.
  9. Divide the rest of the dough in 2 equal mounds. Roll out the first mound of dough on parchment paper until it is about 1/8 inch thick.
  10. Carefully lift the parchment paper and flip the dough unto the buttered baking sheet. Slowly peel off the paper and press the dough down with your fingers to line all the corners and sides of the baking sheet. Trim off excess dough from the ends and use it to mend holes or short corners.
  11. Spread the jam evenly over the dough and sprinkle the piloncillo all over the jam.
  12. Roll out the second mound of dough on parchment paper and gently flip it over the jam and piloncillo filling. Stretch the dough to cover all the corners and press all the edges to seal.
  13. Roll out some dough “snakes” to form a lattice on top. This is a great activity for kids. It’s like rolling out play-dough with your fingers.
  14. Bake for 30-35 minutes until it’s deep golden brown. Let the semita cool completely before serving. It’s actually better the next day.